Saturday 30 November 2013

Drugstore Wearable Series : Using Maybelline Sunbaked Neutrals Palette

Hey all! Today I'm starting a new series that will concentrate on wearable and/or neutral looks using drugstore eye shadow palettes, duos, trios and quads only! I've been doing a lot of very colorful, not so wearable looks recently (Disney Series, My Little Pony Series, Hunger Games Series, etc.), so I thought it would be a nice change of pace to go ahead and do wearable looks! 

Also, since I'm a drugstore makeup enthusiast, I decided to make this series drugstore only so that anyone can recreate them easily, no matter the budget! 

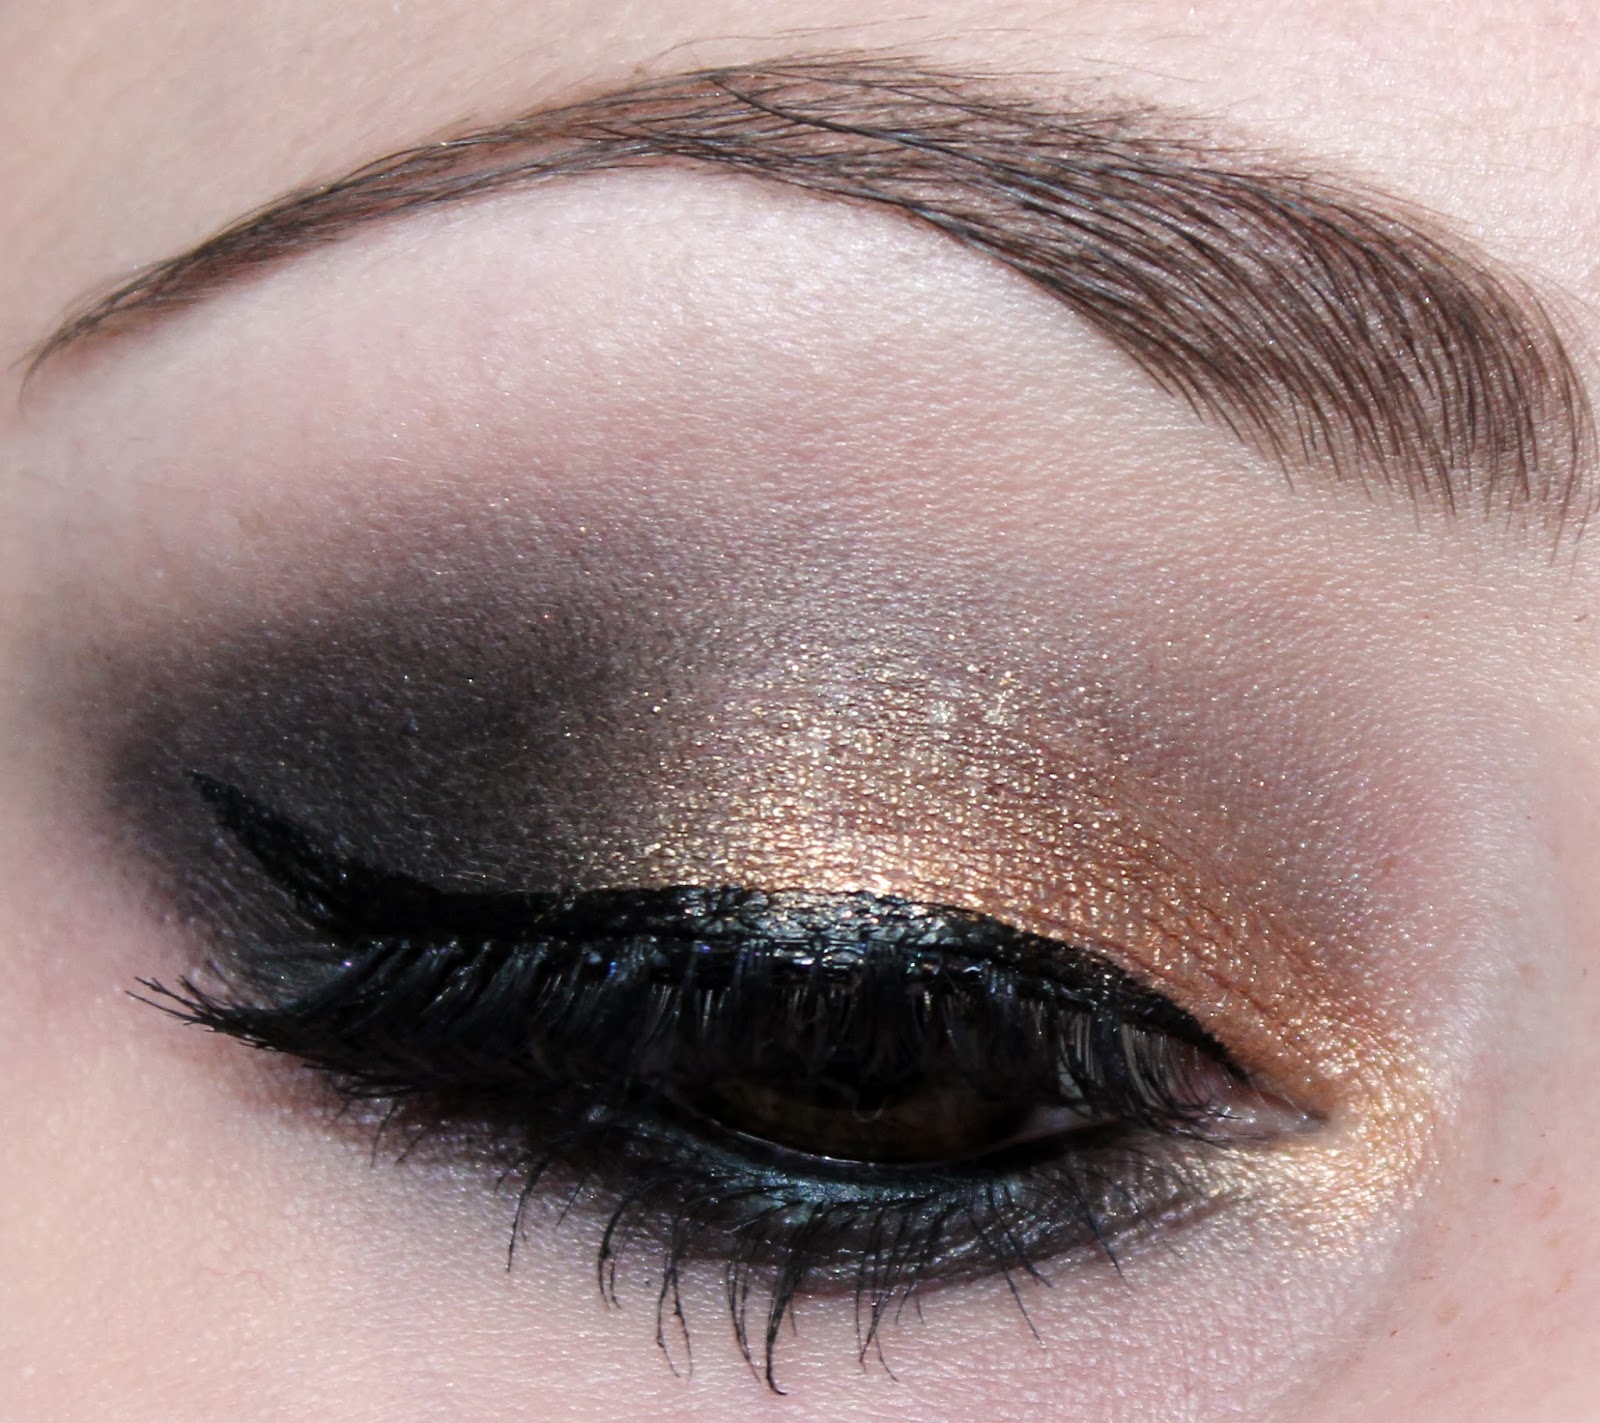
Today I'm starting with a Maybelline Palette that I really love : Sunbaked Neutrals! It's super convenient and portable and I love the color selection. Here's the look I came up with! Super wearable and pretty! What do you think? Would you wear something like this?


Products used :

Base
  • NYX Jumbo Eye Pencil in Yogurt

Eyeshadow & Brows


  • Milani Brow Fix in Light
  • Maybelline Sunbaked Neutrals Palette :
- Light shimmery beige color on the inner corner
- Light Green color on the inner third on the lid
- Deep Green color on the rest of the list
- Light Copper color in the crease
- Dark Bronze color on the outer v and outer part of the lower lash line
- Light brown shade on the inner part of the lower lash line
- Matte Beige color to highlight the brow bone

Liner & Lashes
  • Ardell 315 Accent Lashes
  • Cover Girl Clump Crusher Mascara
  • Rimmel Eye Khol in Nude
  • E.l.f. Liquid Liner in Black

Don't forget to follow me and like my Facebook page for more posts like this ♥

Friday 29 November 2013

Sweet Cherry Blossom Makeup Inspired by Darling Girl Cosmetics

Hey everyone! Today I have more of an understated look to share on here. It's a sweet pink and purple look that kind of reminds me of a romantic spring day when the cherry blossoms are in bloom. Kind of a weird time to be thinking about Cherry Blossoms and perhaps this looks would work better on Valentine's day than in the middle of Fall, but I was playing around with my Darling Girl Cosmetics shadows and this is what I came up with. I love how soft and feminine it is! 

Since the colors I used have a colored sheen to them, they're even more stunning in real life. They appear somewhat muted when photographed. Since the colors are hard to photograph, I'll add links to the colors that I used so that you can check out good swatches of them on the DGC website. Their swatches really show the iridescence and color shifts of the shades.


Products used :

Eye Bases

  • UDPP
  • NYX Jumbo Eye Pencil in Oyster

Eye shadow & Brows

Liner & Lashes
  • Ardell 315 Accent Lashes
  • Cover Girl Clump Crusher Mascara
  • Elf Black Liquid Liner
  • NYX Jumbo Eye Pencil in Milk

Check out other My Little Pony Looks : Rainbow DashTwilight SparkleFluttershy (take 2)RarityPinkie PieSweetie Belle (take 2)Spike Applejack, Scootaloo, Bon Bon, DJ Pon3, Princess Cadence, Trixie, princess Celestia, Lyra, Apple Bloom, and Nightmare Moon

Don't forget to follow me and like my Facebook page for more posts like this ♥

Thursday 28 November 2013

Cover Girl Clump Crush Mascara (Water Resistant Formula) Review and Pictures

Hey everyone! Today I have a mascara review to share with you all. I will be reviewing the Clump Crusher Mascara by Cover Girl! If you've been following me for a while, you probably already know how I feel about this mascara since I'm constantly raving about it, but today I decided I would go more into specifics as to why I love it so much. This way you all will have a better idea of whether or not this mascara would suit your lashes and your tastes! 

Along with the review, I have included before and after pictures of my lashes using the mascara to help you visualize what results you can get when using the mascara. Keep in mind though that my lashes are quite straight, sparse, relatively short and have a tendency to grow in odd directions. Therefore, I don't have nicest lashes to begin with, which means if you naturally have long lushious lashes, this mascara would probably wield even better results for you! Anyway, let's get on with the review! :)


Overview
Formula : on the dry side
Packaging : Plastic green matte tube, slightly domed in the middle. Not the prettiest in my opinion, but stays quite clean looking even after owning it a few months.
Brush : Medium sized with somewhat short, but firm plastic bristles that will easily get to the base of the lashes and grab every single lash . It's a little bit curved.
Ease of removal : Not too much trouble when using a oil-free makeup remover.
Price : 6.96$ CAD at Walmart

Before and After


Does it
Smudge? Not the water resistant formula that I use no. Cannot say for the regular kind.

Clump? Almost none. Obviously if you add 5+ coats it might start to smudge a bit, especially if you've had the mascara for a while (more than a few weeks), but other than that it's very buildable and you can layer it on without fearing for clumps. It definitely lives up to its name for me.

Define? Yes it really separates every lashes giving a nice defined look to the lashes.

Hold a curl? Yes

Lengthen? Yes

Add volume? Yes, quite a lot of it, but it's the clump free kind, which is nice if that's what your looking for.

Is it really water resistant? More or less. It cannot withstand warm water (will run and stick to the skin underneath your eyes), but won't move around during the day if you have oily lids or if your eyes water or get misted by rain or snow.

Would purchase again?
Yes, it's my holy grail mascara and the only one I have been using since last January.  It's the only mascara that really gives me all I want for my straight, short, sparse and every-direction growing lashes.

Overall
You will love it if you like rubber bristle brushes, curved brushes, clump-free volume, separated/defined looking lashes. For reference, other mascaras that I love include The Colossal and The Falsies by Maybelline.

Grade : A+

Wednesday 27 November 2013

Stila All Over Shimmer Duo in Kitten Review and Swatches


Texture & Application : These highlighters are smooth and buttery. The powder is fine and soft, but not so soft that a lot will become loose when you dip your brush in (if you swipe it too hard it will though). To apply this, I like using the Real Techniques contour brush when I want a noticeable highlight. If I want something more subtle, I'll use a fan brush instead. Both powders are very pigmented, meaning that they are very noticeable on the skin even when applied lightly and both apply very evenly.

Finish
 : Both highlighter have beautiful sheen to them without being overly glittery. Depending on which color you apply, you will get a glowy golden highlight or a more subtle and fair-skin friendly light pink highlight.  Personally, on a day to day basis, unless I'm going for a specific look, I like a little bit of both so I mix the two before I apply.

Swatches

On the Cheeks
Left Pinky Shade applied by itself

Right Bronzey shade applied by itself

Both shades applied together

Packaging : The packaging is super cute. It's a small peach colored plastic compact with little stars on it. It's quite light so it's easy to transport. It also seems to be quite durable and it closes securely. It has small mirror inside which could be handy, but it's pretty small so I'm not sure I would use it unless I had nothing else on hand. I'm surprised by how nice this packaging is because the only other Stila product that I own is the In The Lights Palette (which I love by the way) and the cardboard packaging is terrible. It's super messy and dirty now and you can even see the plastic layer on it starting to unglue in some places.


Price
 : 29$ at Canadian Sephora. You can get it on Amazon.com for 14.92$ (score!)

Overall
 : I like that this highlighter has both shades in it, making it very versatile. You could probably accommodate most looks with these two colors. It works wonderfully with my fair skin and the quality is outstanding in my opinion. I'm very happy with this purchase, especially since I only paid 15$ for it. I'm not sure I would be willing to shell out the 29$ Sephora is charging to get it though, so if you can get a good deal on it I definitely recommend, otherwise, I'm sure other cheaper alternatives exist that would be relatively similar to this. I give it a 8/10 because of the price.

Tuesday 26 November 2013

The Hunger Games Inspired Makeup Series : District 13

Hello everyone! Today I'm doing the last of this series inspired makeup looks : District 13! District 13 is thought to have been annihilated during the rebellion, which means other districts are no longer in contact with it. Their industry used to be nuclear power.

If you haven't read second book or watched the second movie yet, do not read below it will contain spoilers which you might not want to know about. (or go ahead, but at you own risk if you like spoilers)

*SPOILER ALERT*

After book 2, we now know that district 13 in fact still exists, and has made a deal with the Capitol during the rebellion to be able to be independent from it. It's where Katniss is transported following the end of the second Hunger Games, where she will be the face of the rebellion. Basically, District 13 becomes the seat of the rebellion, which is why I took inspiration from that, rather than going for a nuclear theme. (which I wouldn't have known how to represent anyway). Katniss's mockingjay pin also becomes the symbol of the rebellion, which is what I chose to represent for this look. I got inspired by this image of the mockingjay pin over a black background :

*END OF SPOILER*


Products used :

Base
  • UDPP
  • NYX Jumbo Eye Pencil in Black Bean
  • Wet n Wild Fantasy Makers Cream Glitter Palette (Gold Shade)
Eyeshadow & Brows
  • Urban Decay Naked 2 Palette (Black and highlight shade)
  • Wet n Wild I'm Getting Sunburnt Trio (Gold)
  • Milani Brow Fix Brow Kit in Light
Liner & Lashes
  • Ardell Wispies Lashes
  • Cover Girl Clump Crusher Mascara
  • Milani Liquid'Eye Liner Pencil in Black
  • E.l.f. Black Liquid Liner

This concludes my Hunger Games inspired series! I hope you enjoyed all 13 looks and let me know in the comments which one was your favorite. Also, let me know what you would like to see next, I would love the have your suggestions!

Don't forget to follow me and like my Facebook page for more posts like this ♥

Monday 25 November 2013

My Little Pony Series : Queen Chrysalis Inspired Makeup

Hey everyone! Welcome back to another installment of this My Little Pony Series. Today, I was inspired by Queen Chrysalis. I really wanted to do something inspired by her because I thought she was really unique looking and that it would be fun to do something original to represent her.

I decided to recreate the holes in her body and hair on my lids! It was kind of a challenge to find a way to do it and to put that plan into action, but I think it turned out pretty cool looking in the end. If you're curious, I used rhinestones (glued with eyelash glue) and nail stickers which I glued on my lids until the colors were all applied. I peeled them off after that to create the holed look. I colored the holes in with a nude pencil to make them stand out even more. I also created the shape of her hair in the crease and I replicated the little balls that stick out of her head on my lower lash line. I don't think she has a cutie mark so I skipped that, but correct me if I'm wrong.


Products used :

Eye Bases

  • UDPP
  • L'Oréal Black Gel Liner

Eye shadow & Brows
  • BH 120 Palette (1st Edition)
  • Stila In The Lights Palette (Highlight color)
  • Urban Decay Naked 2 Palette (Blackout)
  • Milani Brow Fix Brow Kit in Light

Liner & Lashes
  • Ardell 315 Accent Lashes
  • Cover Girl Clump Crusher Mascara
  • Elf Black Liquid Liner
  • Milani Liquif'Eye Liner Pencil in Black
  • Rimmel Nude Eye Khol

Check out other My Little Pony Looks : Rainbow DashTwilight SparkleFluttershy (take 2)RarityPinkie PieSweetie Belle (take 2)Spike Applejack, Scootaloo, Bon Bon, DJ Pon3, Princess Cadence, Trixie, princess Celestia, Lyra, Apple Bloom, and Nightmare Moon

Don't forget to follow me and like my Facebook page for more posts like this ♥

Sunday 24 November 2013

The Hunger Games Inspired Makeup Series : District 12 (The Girl on Fire)

Hey all! Today I have a makeup look that is inspired by District 12 of Panem from the Hunger Games. This is the Katniss Everdeen's district, where she grew up and lives with her family. The district's industry is mining, but I was more inspired to create a look to reflect the main character's persona rather than a look to represent mining. 

The only colors I could think of for a mining themed look were black and gray, which would have ended up looking too much like District 2 for my liking. Therefore I decided to go another route for this one. Instead, I was inspired by the nickname that was given to Katniss by her stylist Cinna in book 1 of the series : The girl on fire

If I remember correctly it had something to do with her district in the first place, so it's not completely unrelated. Throughout books 1 and 2, the nickname has become a symbol of Katniss and her prowess in the Hunger Games, which is why I thought it was perfect to represent the Hunger Games winner of District 12, Katniss Everdeen. 

This is another look that I decided to go quite literal for. I went for a flaming eye, nothing less! I hope you enjoy this look. Let me know in the comments what you think of it! ♥


Products used :

Base
  • UDPP
  • Wet n Wild Fantasy Makers Cream Glitter Palette (Gold and Copper tones)
Eyeshadow & Brows
  • Bh Cosmetics 120 Color Palette (1st Edition)
  • NYX Copper Single Shadow
  • Wet n Wild Trio in I'm Getting Sunburnt (Gold shade)
  • Coastal Scents 88 Warm Palette (brows)
Liner & Lashes
  • Ardell 315 Accent Lashes
  • Cover Girl Clump Crusher Mascara
  • Milani Liquid'Eye Liner Pencil in Black
  • E.l.f. Black Liquid Liner

Don't forget to follow me and like my Facebook page for more posts like this ♥

Saturday 23 November 2013

Fall Series : What I Eat in a Day

Hello everyone! For some reason, I'm always super interested in knowing what other people eat on an everyday basis. I often read Anna Saccone's What I ate Wednesday and I always thought that it was a fun concept so today I decided to share what I typically eat in a day during the fall months!

Breakfast

I usually have breakfast around 7 am when I have school. I always like a cup or two of coffee with my berry smoothie to help me start off my day. If you're interested in knowing how I make my everyday berry smoothie check out my recipe here.

Lunch
 Next, this is the kind of lunch I will be having if I'm coming back home from school. I could show you lunches that I bring at school if any of you is interested as well. This is a grilled cheese sandwich on whole wheat bread with tomato based veggie soup, perfect for cool fall days!

Dinner
 My last meal of the day varies according to my mood. Today, I felt like cooking so I made a salad with tuna on a 9 grain wrap. In case you're curious, my usual salad contains lettuce, a bit of sharp cheddar cheese, a quarter of an avocado, marinated roasted red peppers, sugar snap peas and cucumbers. It's my favorite!

Snacks

To make my life easier, I took a picture of all the snacks I had today instead of snapping a picture every time. I like to have a variety of things for snacks, but I'm big on fruits a lot of the time. Today I had a strawberry-chocolate yogurt with granola, one mandarin, a cup of peach applesauce and a red plum. I also had 2,5 liters of water (5 bottles of water during the day) and a few cups of ginseng Oolong tea.

---

That's all I eat on a typical day! Obviously my meals do vary so if you're interested for me to do this more often, let me know!

Don't forget to follow me and like my Facebook page for more posts like this ♥

Friday 22 November 2013

The Hunger Games Inspired Makeup Series : District 11 (Agriculture)

Hi all! Here's another District inspired makeup look from Hunger Games! It's district 11 from Panem, the district of agriculture.

I was inspired for this look by the colors of the crops and fresh tilled earth, so I went for gold and brown tones as well as a nice warm toned green. I was also inspired by the glowing sun, which gives life to the harvest. I went for a copper liner to keep things soft and pretty. Overall, I'm really glad of how this look turned out! It's probably one of the most wearable looks I have done yet for this series! Let me know what you think in the comments! Is this something you would wear?


Products used :

Base
  • NYX Eyeshadow Base in Nude

Eyeshadow & Brows
  • The Balm Nude Tude Palette
  • Costal Scents 88 Warm Palette
  • BH 120 Color Palette (1st Edition)
  • Milani Brow Fix Brow Kit in Light
Liner & Lashes
  • Cover Girl Clump Crusher Mascara
  • Stila Smudge Stick in Brown

Don't forget to follow me and like my Facebook page for more posts like this ♥

Thursday 21 November 2013

My Little Pony Series : Trixie Inspired Makeup

Hey all! I'm doing another My Little Pony Inspired makeup look! I'm starting to run out of Ponies to recreate, so I guess this series is almost done! I know there are many more unnamed ponies, but I think I'll concentrate on the ones that appear more regularly. Anyway, I think next I will do is Queen Chrysalis and then Derpy, and that will probably be it, unless any of you has a request for another one in particular. Today I'm doing the Great and Powerful Trixie!


Products used :

Eye Bases

  • UDPP
  • NYX Jumbo Pencil - Milk

Eye shadow & Brows
  • BH 120 Palette (1st Edition)
  • Stila In The Lights Palette (Highlight color)
  • Wet n Wild Palette in Blue Had Me At Hello
  • Darling Girl Cosmetics Loose Shadow in Basket Case
  • Milani Brow Fix Brow Kit in Light

Liner & Lashes
  • Ardell Inspired Lashes
  • Cover Girl Clump Crusher Mascara
  • Elf Black Liquid Liner
  • NYX Jumbo Pencil - Milk

Check out other My Little Pony Looks : Rainbow DashTwilight SparkleFluttershyRarityPinkie PieSweetie BelleSpike Applejack, Scootaloo, princess Celestia, Lyra, Apple Bloom and Nightmare Moon

Don't forget to follow me and like my Facebook page for more posts like this ♥

Wednesday 20 November 2013

The Hunger Games Inspired Makeup Series : District 10 (Livestock)

Hey all! Today I have a District 10 inspired makeup to share with you all! District 10's industry is livestock which is why I chose to go with earthy colors and a matte finish. I went for a white and brown smokey look on the upper lid to represent the colors of a brown and white spotted cow. The resason for this is when I think of livestock, the first farm animal that usually comes to my mind is a cow!  Then, I went for a nice green accent on the lower lid to represent the grass underneath the livestock. Basically, it's another one of my beloved pop of color looks! If you've been following me since earlier this year, you probably know how much I love those already. :P

Anyway, this is one of the most wearable looks I have done to date for this series, so I hope you enjoy it! Next up is District 11 which is agriculture and it will also be wearable, so look out for that one as well.


Products used :

Base
  • UDPP
  • NYX Jumbo Eye Pencil in Milk
Eyeshadow & Brows
  • Bh Cosmetics 120 Color Palette (1st Edition)
  • Coastal Scents 88 Warm Palette
  • Milani Brow Fix Brow Kit in Light
Liner & Lashes
  • Ardell 315 Accent Lashes
  • Cover Girl Clump Crusher Mascara
  • NYX Jumbo Pencil in Milk
  • E.l.f. Black Liquid Liner

Don't forget to follow me and like my Facebook page for more posts like this ♥

Tuesday 19 November 2013

Recent Favorite Lip Combo : Revlon + NYX

Hey all! Recently, I've been obsessed with a new lip combo. I think these two products look fantastic together and are great for everyday wear, so I thought I would share it with you all!

I've been wearing Revlon Just Bitten Kissable Lip Stain in Honey with NYX Mega Shine Lip Gloss in Natural over top. 

I just love how it looks! Natural and a little glossy. Super comfortable on the lips! What do you think, would you wear this combo? Let me know in the comments!

---

Don't forget to follow me and like my Facebook page for more posts like this ♥

Monday 18 November 2013

The Hunger Games Inspired Makeup Series : District 9 (Grain)

Hey everyone! Today I'm back with another Hunger Games Inspired Makeup Look! This on is inspired by District 9, the district of grain!  Hope you enjoy! 


Products used :

Base
  • NYX Eyeshadow Base in Nude

Eyeshadow & Brows
  • Darling Girl Cosmetics Loose Blush/Highlighter in Curious Crocus
  • Darling Girl Cosmetics Loose Shadow in Scarab
  • Urban Decay Naked 2 Palette
  • Stila In The Lights Palette
  • Wet n Wild Fantasy Maker Cream Glitter Palette
Liner & Lashes
  • Cover Girl Clump Crusher Mascara
  • Rimmel Eye Khol in Nude
  • Wet n Wild Fantasy Maker Cream Glitter Palette

Don't forget to follow me and like my Facebook page for more posts like this ♥

LinkWithin

Related Posts Plugin for WordPress, Blogger...