Sunday, 20 October 2013

My Everyday Foundation Routine

Hey all! Today I decided to share with you all the products that I use on a regular basis to make my skin look nice and to hide any imperfections! I've mentioned this before, but I don't wear makeup every single day. So this foundation routine is essentially what I'll do if I decide to wear makeup (and the foundation routine I use to prep my skin for any blog posts on here!). So in case you were wondering what's on my skin, well here it is!

My skin

First, I'll talk a little about my skin, so that you can determine if the products I'm using would suit your skin in case you want to try any of these products. My skin is usually normal to dry and I don't get oily very often. (although this spring and summer my skin has been uncharacteristically oily) The main issues I have with my skin is redness in the cheeks (I have rosacea) which I need to cover and some acne here and there. My under eye area also tend to be dry and I get flaky skin on my nose and forehead on occasion. With that said here is how I proceed to concealer and brighten my complexion :

Base

First, I apply moisturizer. Lately I've been liking the Moisture hydrating lotion by Neutrogena because it has SPF 30. I like using the Real Techniques buffing brush or Expert Face Brush to apply this. In the winter, I use a heavier moisturizer because my skin gets drier. After moisturizing, I spray my face with the Urban Decay All Nighter Spray. This is a new step to my routine and I haven't determined how useful it is yet, but for now, I'm testing it out.

Foundation


Next, I apply my foundation using the same brush.  (I also often use my hands for this) Lately, my favorite is the Rimmel Wake me Up Foundation. I love how silky it is on the skin and it think the coverage is great. It leaves a nice dewy finish, which I prefer since I tend to have dry skin. I'm not big on matte finishes on myself since it tends to bring forward the dry patches on my skin which isn't very flattering. Personally, I like doing my foundation first for a couple reasons. First, many of my problem areas are usually well concealed with just foundation which eliminates the need to cake on more product by adding concealer. Second, I hate fixing fallout from my eye shadow once I have foundation on. I prefer wiping everything clean and then applying my face products. Lastly, I haven't found a concealer that I like a lot for my under eye yet so I like to apply a slippery foundation on first so that the concealer has a base so set on and it doesn't get into the fine lines around my eyes as much. Phew, that was a lot of information wasn't it? I guess I have loads to say about foundation :P

Concealing

Next, I conceal anything that is still showing through with either Maybelline Mineral Power concealer and/or Maybelline Dream Lumi Highlighting concealer. I like to apply the lumi in a triangle shape underneath my eyes from time to time if I'm going for a bright highlighted look. I like  to pat on my concealer to blend it out. I also sometimes use the deluxe crease brush from Real Techniques to blend, especially if I went heavy underneath the eyes and I don't want to ruin my blending job by patting with my fingers over it.

Powders

 Last, I powder the middle of the skin using the Stay Matte Powder by Rimmel and with a blush brush by Eco Tools. I only do it in the center of my face to conserve the dewyness of the foundation. After that, I also apply blush with the same brush. I don't really have an everyday blush, but I do really like this one by Rimmel called Pink Sugar. Next I highlight the top of my cheekbones with the Stila Highlighting duo in Kitten using the contour brush by Real Techniques. After all is applied, I spray my face again with the Urban Decay Spray to help it stay on longer and to attenuate the look of powder on my skin, which I am not a fan of.

The results

Clearly, I also have eye makeup on here, but let's focus on the skin :P I also want to mention that my lights are very hot, which make my skin look a little more shiny than it really is in real life.

That's all I do! I hope you enjoyed this post! Let me know in the comments what your favorite face products are! I'm love trying out new ones! I really want to try a few new foundations and concealers. Let me know if you have any recommendations.

Don't forget to follow me and like my Facebook page for more posts like this ♥


Friday, 18 October 2013

Darling Girl Cosmetics Loose Shadows Swatch Fest

Hey everyone! Today I thought I would share my swatches of all the Darling Girl Cosmetics loose shadows that I own. They are my favorite brand of shadows at the moment. Anyway, enjoy the swatches! Also, let me know if you would like to see makeup looks using any of these colors :)

 Curious Crocus, Lucky, Morbid Angel 

 Chimera, Coco Loco, Beluga Bebe, O RLY?

 Sirena, Impervious, Sultry Siren, Scarab

 Rhapsody, Groovology, Basket Case, Alright Ma!

 Hope, My Little Pony, Obviously a Wig, Nightwatch, Incognito

London Calling, Dark Heart, Dark Crystal, Bio-Exorcist

Note : Some of the pinks and purples will stain. You can somewhat see the pink stain leftover from the last swatches on my hand on the last picture.

---

Don't forget to follow me and like my Facebook page for more posts like this ♥

Wednesday, 16 October 2013

Fall 2013 Bath and Body Works Haul

Hello everyone! Going alongside with my fall obsession, I adore anything that has a scent that reminds me of fall. That's why I always look forward to going to Bath and Body Works to get their fall scents the most. I do have a few three wicks candles left from last year's 2 for 20$ sale, so I didn't get any of those this time (plus they were 2 for 32$ which I think is way too expensive).

Check out what I got!
I got 5 hand sanitizers (5 for 5$), 2 mini candles (2 for 6$), one in Pumpkin Cupcake (one of my favorites from last year, I actually finished the three wick candle of this completely) and one in Heirloom Pear which I believe is a new scent. I also got three wallflower refills (3 for 10$), two in Nutmeg and Spice No.1 (my absolute favorite, I'm also almost out of the three wick candle) and one in Pumpkin Cupcake. As you can see, I basically stocked up on my favorites this year. I have a 30% off coupon which I might use on three wick candles if they have the 2 for 20$ sale any time soon. Last thing I picked up is the cutest owl wallflower ever. It was 7.50$, but I couldn't pass it up, it's just perfect for fall! It now sits proudly in my bathroom and I'm really glad I got it.

---

That's all I got from Bath and Body Works! If you'd like a review of any of these products let me know! Also, what is your favorite fall scent?

Don't forget to follow me and like my Facebook page for more posts like this ♥

Monday, 14 October 2013

Fall Series : Night out Look - Gold, Copper & Purple (Drugstore)

Hey all! Today I'm sharing a night out look that's perfect for fall! It's a copper, gold and purple toned smokey look that will look great when going out!

And... Picture Spam! Because I'm in love with how this looks on my green eyes. Sorry :X


Products used :

Base
  • NYX Eyeshadow Base - Nude
  • Maybelline Color Tattoo in Bad to The Bronze

Eyeshadow & Brows
  • Wet n Wild Petal Pusher Palette (Left Crease Color)
  • Wet n Wild Knock on Wood Trio (Eyelid Color)
  • NYX Single Eyeshadow in Rust
  • NYX Loose Shadow in Nude
  • Wet n Wild Cool As a Cucumber Trio (Crease Color)
  • Wet n Wild Walking on Eggshells Trio (Highlight Color)
  • Milani Brow Fix in Light

Liner & Lashes
  • Cover Girl Clump Crusher Mascara
  • Milani Liquif'eye Eyeliner Pencil - Perfect Purple
  • L'Oréal Gel Liner - Black

---

That's all for today. Did you guys enjoy this look? Would you wear this on a night out? Let me know in the comments :) 

Don't forget to follow me and like my Facebook page for more posts like this ♥
  

Sunday, 13 October 2013

Beauty Haul : Target, Drugstore, Sephora and Winners

Hey everyone! Today I'm diverting from my usual blog post every other day schedule, because I was too excited to wait and share this later! It's a makeup haul and I'm especially excited with all the things that I got. :) I went to Target for the first time (they just started opening them in Quebec :D) and I also went to the drugstore, Sephora and Winners (for nail polishes mainly).


Winners : 2 nail polishes by China Glaze (Tantalize Me and Frostbite) and 1 by OPI (in Dulce de Leche). It's my first OPI ever and I have to say, it's amazing! Love the subtle nude color ♥

I also got two Nicole by OPI nail polishes at Dollorama. I got Back to Reality...TV and Green Up Your Act, which is a really nice army green and I'm really loving it right now!

Sephora : I didn't get much at Sephora, but I got the most beautiful forest green liner *I'm sensing a theme here :P*. It's buttery and amazing, I didn't know Sephora made such great pencil liners, and they have a huge range of colors too. They're only 11$ each, it's crazy! I also got a small size of the Urban Decay primer potion as a backup because I'm running low on mine.

Target : I got three of the new limited edition, black packaging Babylips (as if I needed more of those lol), the L'Oréal Magic Lumi foundation and primer, Maybelline Age Rewind concealer, Cover Girl Shimmering Sands Eyeshadow trio, Ardell Wispies, and a bunch of NYX stuff.

For the rest, I got it at the drugstore and Walmart. I have a Quo makeup palette which my boyfriend got me ♥ an Annabelle eyeshadow trio (first time I try the brand) and the highlight Powder by Wet n Wild in Reserve your Cabana.

That's all I got, it's a lot of stuff, but it was bought over a few weeks! I cannot wait to start playing with all these new goodies :D Let me know if you would like to see reviews on any of the products!


Don't forget to follow me and like my Facebook page for more posts like this ♥

Saturday, 12 October 2013

Wearable Color : Neutral Eye with Vibrant Green Liner

Recently, I went to Ardène Dépôt (they sell some of the stuff from previous collections at 70% off) to pick up some earrings and camis. While I was at the checkout, I noticed that they sold colored liquid liner. I'm usually wary of their makeup for some reason, but since I'd been on the hunt for colored liners and I'd had trouble finding what I was looking for, and since these were 1.50$ each, I decided, why not give them a try! I got two glitter liners and two colored liners, including this vibrant green shade!

I love the way it looks on! It's very easy to apply and the brush of the liner is very thin which gives you a lot of control. I'm really happy with this purchase, except for the fact that this green liner stains! :s  (The other colors don't as far as I know).


That's all for this quick eye makeup look! Don't forget to follow me and like my Facebook page for more posts like this ♥

Thursday, 10 October 2013

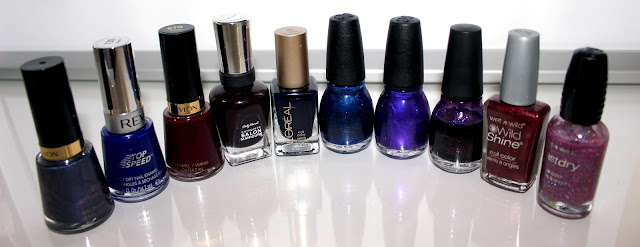
Fall Series : Favorite Nail Polish Shades for Autumn

Hey everyone! Today I'm sharing another post from my Fall Series! This one is about my favorite polish shades for autumn! If you followed my blog over the summer, I also did one of these for my favorite summer polish shades

Fall is my favorite season of the year so I'm particularly excited about these! It's mostly dark shades of red, blue and purple as you can see! I don't have a true red polish in my collection anymore (I can't believe I hadn't noticed until now) and I plan on getting a new one soon, but if I did, I would have included it into this selection.

Favorite Polishes for Fall

Nail Swatches
Revlon polishes : Star Attraction, Royal and Vixen

Star Attraction, Vixen, Royal 

Sinful Colors Polishes : Midnight Blue, Let's Talk, Daddy's Girl

Daddy's Girl (jelly finish), Let's Talk, Midnight Blue

- L'Oréal After Hours (this one stains quite a bit, use with a top coat or get blue tinged nails after)
- Sally Hansen Oxblood
- Wet n Wild : Burgundy Frost and Hannah Pinktana (this one dries semi matte)

Oxblood, Burgundy Frost, After Hours, Hannah Pinktana

That's all for my favorite nail polishes for Fall. What colors do you like to wear when the weather grows colder? What are you favorite polishes? Let me know in the comments! I'm always looking for new nail polish shades to try out!

Don't forget to follow me and like my Facebook page for more posts like this ♥

Tuesday, 8 October 2013

Fall Series : My Everyday Makeup Look For Fall

Hey all! Today I'm sharing my everyday makeup look for the fall months. Now, I don't wear makeup every single day (so maybe it would be more aptly called my go-to makeup), especially not eye shadow, but whenever I decide to put makeup on, this is pretty much what I end up with!

The makeup look I go for most often during the fall is dewy skin, with a pretty highlight, neutral lips and a shimmery champagne color on the lids. I know many people tend to gravitate more towards a matte finish foundation during the colder months, but personally, as the weather grows colder, my skin becomes drier, which means I need the dewy finish more than ever. That's why I prefer this type of finish year round. I haven't included the skin products I used in this post, but look forward to a Foundation Routine coming from me soon!


Close up
 With the light, it almost looks like I have nothing on, but I definitely do! I have Bootycall all over the lid and Snakebite on the outer corner. I have Tease in the crease and Foxy to highlight the brow bone.


 What I Used

UDPP, Black L'Oréal Gel Liner, Clump Crusher Mascara, Nude Eye Khol by Rimmel, Honey Kissable Balm Stain by Revlon, Naked 2 Palette by Urban Decay, Brow Fix in Light by Milani and Clear Great Lash Mascara by Maybelline

That's it for today! Would you wear something like this? What's your go-to makeup in the fall? Let me know in the comment!

Don't forget to follow me and like my Facebook page for more posts like this ♥

Sunday, 6 October 2013

Fall Series : Wearable Pop of Color for Fall - Hunter Green

Hey everyone! Over the summer, I shared that I was obsessed with wearing color on my lower lash line as a way to incorporate color in wearable eye looks. I showed looks with a purple and a blue pop. (check out the post here) Anyway, so I'm still very much into that at the moment and now that it's fall I thought I'd show you all a Fall appropriate pop of color! I went for a deep hunter green color with a pretty neutral eye! I love it! What do you think of this one? Which one do you prefer? Blue, purple or green? Let me know in the comments!


In case you're wondering what green this is, it' from the Cool As A Cucumber Palette from Wet n Wild. It's so pretty! This is applied wet to increase the intensity and metallic sheen of the shadow.

Don't forget to follow me and like my Facebook page for more posts like this ♥


Friday, 4 October 2013

Colored Gradient Brow Tutorial

Hey everyone! Lately I've been really into filling in my brows. It's a totally new thing for me, since I never used to do it. Now that I've started doing it, I always feel like my face looks incomplete unless I fill my brows in a little bit. SO I've been practicing and playing around with brow looks in the past few months.

I also started doing more elaborate brow painting for my colorful looks. One thing that I really like to do and that really adds to the drama of my inspired makeup looks is a colored or gradient brow. At first I wasn't sure how to proceed with this, but with a little trial and error I have found a technique that works pretty well for me. Today I'm going to share a tutorial I made on how to achieve colored or gradient brows! Check out some of the looks I have made using this technique : Princess Celestia, The Little Mermaid


What you will need

♥ White Base, I'm using NYX Jumbo Pencil in Milk
♥ Eye shadow(s) of your choice
♥ A small flat shading brush and an angled liner or brow brush
♥ Cotton Swabs
♥ Eye Makeup remover

Tutorial

1) Apply the white base all over your brow.
2) Clean around the edges using a cotton swab.
3) Using the flat shading brush pat on your darkest eye shadow.
4) If you're going for a one color brow, skip this step. Next, using the angled brush, pat on the lighter shadow on the outer part of the brow only and blend lightly until you get a gradient effect.
5) Using a cotton bud and makeup remover, clean around your brow to shape it. You can also use the angled brush with more of the dark shadow to help redefine the edges.

---

That's all! You now have a cool looking gradient/colored brow. Easy isn't it? Let me know how you liked this tutorial in the comments!

Don't forget to follow me and like my Facebook page for more posts like this ♥


LinkWithin

Related Posts Plugin for WordPress, Blogger...