Wednesday, 20 November 2013

The Hunger Games Inspired Makeup Series : District 10 (Livestock)

Hey all! Today I have a District 10 inspired makeup to share with you all! District 10's industry is livestock which is why I chose to go with earthy colors and a matte finish. I went for a white and brown smokey look on the upper lid to represent the colors of a brown and white spotted cow. The resason for this is when I think of livestock, the first farm animal that usually comes to my mind is a cow!  Then, I went for a nice green accent on the lower lid to represent the grass underneath the livestock. Basically, it's another one of my beloved pop of color looks! If you've been following me since earlier this year, you probably know how much I love those already. :P

Anyway, this is one of the most wearable looks I have done to date for this series, so I hope you enjoy it! Next up is District 11 which is agriculture and it will also be wearable, so look out for that one as well.


Products used :

Base
  • UDPP
  • NYX Jumbo Eye Pencil in Milk
Eyeshadow & Brows
  • Bh Cosmetics 120 Color Palette (1st Edition)
  • Coastal Scents 88 Warm Palette
  • Milani Brow Fix Brow Kit in Light
Liner & Lashes
  • Ardell 315 Accent Lashes
  • Cover Girl Clump Crusher Mascara
  • NYX Jumbo Pencil in Milk
  • E.l.f. Black Liquid Liner

Don't forget to follow me and like my Facebook page for more posts like this ♥

Tuesday, 19 November 2013

Recent Favorite Lip Combo : Revlon + NYX

Hey all! Recently, I've been obsessed with a new lip combo. I think these two products look fantastic together and are great for everyday wear, so I thought I would share it with you all!

I've been wearing Revlon Just Bitten Kissable Lip Stain in Honey with NYX Mega Shine Lip Gloss in Natural over top. 

I just love how it looks! Natural and a little glossy. Super comfortable on the lips! What do you think, would you wear this combo? Let me know in the comments!

---

Don't forget to follow me and like my Facebook page for more posts like this ♥

Monday, 18 November 2013

The Hunger Games Inspired Makeup Series : District 9 (Grain)

Hey everyone! Today I'm back with another Hunger Games Inspired Makeup Look! This on is inspired by District 9, the district of grain!  Hope you enjoy! 


Products used :

Base
  • NYX Eyeshadow Base in Nude

Eyeshadow & Brows
  • Darling Girl Cosmetics Loose Blush/Highlighter in Curious Crocus
  • Darling Girl Cosmetics Loose Shadow in Scarab
  • Urban Decay Naked 2 Palette
  • Stila In The Lights Palette
  • Wet n Wild Fantasy Maker Cream Glitter Palette
Liner & Lashes
  • Cover Girl Clump Crusher Mascara
  • Rimmel Eye Khol in Nude
  • Wet n Wild Fantasy Maker Cream Glitter Palette

Don't forget to follow me and like my Facebook page for more posts like this ♥

Sunday, 17 November 2013

Makeup look : Glittery Silver Smokey Eye With Pop of Purple

Hey everyone! The other night, I was messing around with my palettes and I wanted to do something with my new Milani Purple pencil liner as well as my new Ardène Silver/Rainbow Glitter Liner. I played around a little and this is what I came up with! It's a silver smokey eye with glittery liner and a pop of purple on the lower lashline and waterline. I kind of like how it turned out, what do you think of this?


I haven't done a makeup look without an inspiration for a long time! It feels kind of odd! I don't have as much to say about it because of that. Anyway, I guess that's all for today!


Don't forget to follow me and like my Facebook page for more posts like this ♥

Saturday, 16 November 2013

The Hunger Games Inspired Makeup Series : District 8 (Textiles)

Hey everyone! Today I have another Hunger Games inspired makeup look to share! This one is district 8 for which the main industry is textiles. Now I was really uninspired by this theme, so I came up with a diamonds pattern look, which kind of looks clownish now that it's all said and done. It's not that I don't think it looks nice, but it's kind of more Halloweeny than anything else, ahah. Anyway, that's all I got for this one, sorry guys! Hope you enjoy it none the less.


Products used :

Base
  • NYX Eyeshadow Base in Nude
  • NYX Jumbo Eye Pencil in Milk

Eyeshadow & Brows
  • L'Oréal Studio Gel Liner in Very Black
  • NYX Studio Liquid Liner in Extreme Blue
  • Ardène Liquid Liner in Silver
  • Coastal Scents 88 Warm Palette
Liner & Lashes
  • Ardell Lashes
  • NYX Jumbo Eye Pencil in Milk

Don't forget to follow me and like my Facebook page for more posts like this ♥

Friday, 15 November 2013

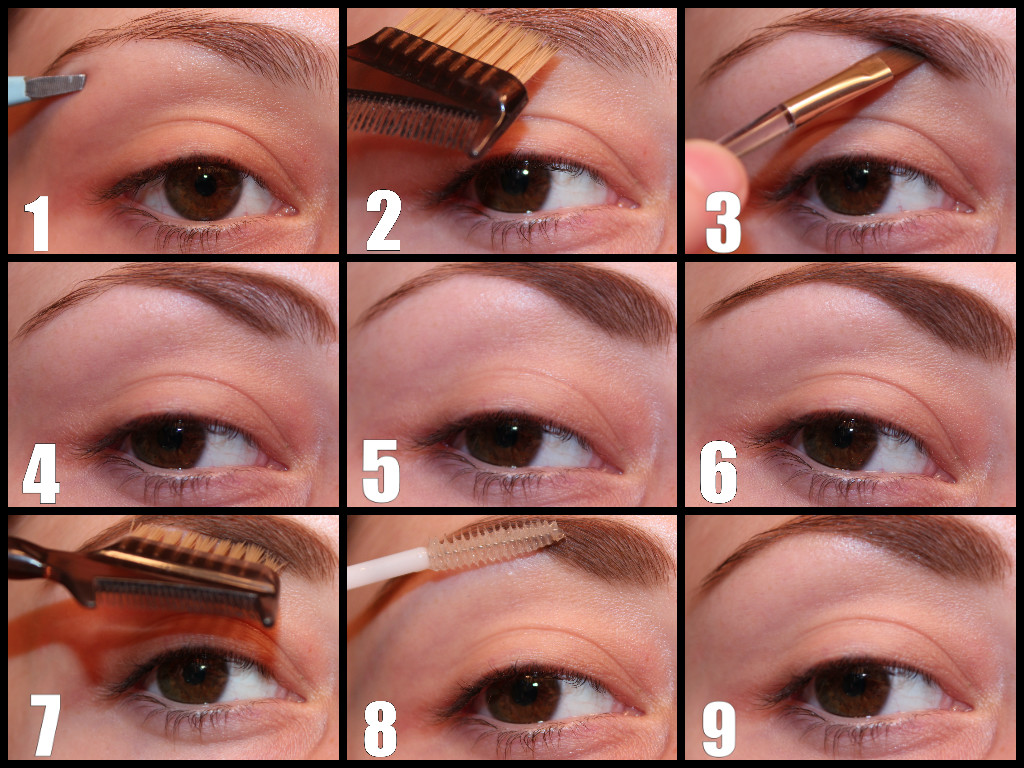
Beginner Series : How To Fill In Eyebrows - Step By Step Tutorial

Hello everyone! Today I'm back with my beginner series! Today I thought I would share my tips and tricks as well as a step by step tutorial on how I fill in my eyebrows! My method is quite easy and quick and really makes a difference. Keep reading if you're interested to see the tutorial :)


- Brow powder that matches your brows. I believe if you have light hair you need to go a few shades darker and if you have dark hair it's the opposite, but don't quote me on that! For my color, I went with trial and error. I use this Milani Brow Fix Kit and I mix both brown colors to achieve a color that I like.
- An angled brow brush. I like to use the one that comes with the kit, but you can use any one that you have.
- Tweezers
- Clear brow gel, I like to use clear mascara for this purpose. As you can see mine is starting to look brown and gross, but it's still works the same.
- A brow comb
- A shimmery highlight shade

How to Fill In Your Eyebrows

1) Tweeze any stray hairs.
2) Comb the lashes so that no hair is sticking out.
3) Using the angled brush and the brow powder in your chosen color, start filling the brow at the base on the brow. I like to fill in the front on my brows first and the tail last because that's where I apply the most product. Use short strokes to get the effect of hairs.
4) Using the same technique, now define the upper portion of the brow.
5) Fill it in.
6) Finish by filling in the tail of the brow.
7) Brush the eyebrows into place again. This will help reduce the appearance of drawn on brows and make it look more natural by getting rid of any excess product.
8) Using the brow gel, apply a small amount to the brows to help seal the product as well as keep them in place during the day.
9) This last step is optional, but if you want to further define the brow, you can use an angled brush and apply a light shimmery shade close to the brow on the brow bone.


---

That's all! You're brows are now groomed and ready for the day. Pretty easy right? Let me know if this tutorial was helpful to you!

Don't forget to follow me and like my Facebook page for more posts like this ♥

Thursday, 14 November 2013

The Hunger Games Inspired Makeup Series : District 7 (Lumber)

Hey everyone! Today I have another Hunger Games inspired makeup look for you all! It's inspired by District 7 of Panem for which the main industry is lumber.

This time, I went all out whimsical and drew a tree branch complete with leaves on my eyes. I haven't mentioned this before, but a certain amount of my blog posts are done in advance and scheduled to a particular date so that I have blog posts going up regularly, even if I'm super busy with school, work or anything else. Lately, many of the looks I have done have been quite cartoon-like and I guess it's probably because Halloween is just around the corner as I write this. Anyway, just a random tidbit I felt like sharing!


Products used :

Base
  • UDPP
  • NYX Jumbo Eye Pencil in Milk

Eyeshadow & Brows
  • BH 120 Palette (1st Edition)
  • Wet n Wild Trio in Cool As A Cucumber
  • Stila In The Lights Palette
  • Sephora Contour Eye Pencil in Go For A Ride
  • Milani Brow Fix in Light

Liner & Lashes
  • Ardell 120 Demi Lashes
  • Maybelline The Rocket Mascara
  • Maybelline Eyestudio Gel Liner in Brown

Don't forget to follow me and like my Facebook page for more posts like this ♥

Wednesday, 13 November 2013

My Little Pony Series : DJ Pon3 (Step by Step)

Hey everyone, today I'm doing yet another look inspired by My Little Pony! Today, I'm doing another background pony, DJ Pon3! She looks awesome with her cool purple shades and her electric blue mane. I was so inspired that I went a little wild with this one, ahah! Keep scrolling and you'll see what I mean XD
So, I went a little crazy with this one. My idea was to reproduce her cool shades on my my lids and her mane on the lower lid. Obviously the finish result is anything but wearable (not that any of my Little Pony look is, but this one is particularly crazy looking), but I'm quite happy of how it looks! The only thing I'm kind of bummed about is how crackly the outline of the mane is on my lower lid, because the liner I used was kind of cheap, but anyhow I think it looks cool nonetheless.


In case you're curious of my process when doing a look this elaborate, I thought I'd include Step by Step pictures for this look!

Step by Step


Products used :

Eye Bases

  • UDPP
  • NYX Jumbo Pencil - Milk

Eye shadow & Brows
  • BH 120 Palette (1st Edition)
  • Coastal Scents 88 Warm Palette
  • Urban Decay Naked 2 Palette
  • NYX Eye Shadow Palette in Velvet Rope
  • Milani Brow Fix Brow Kit in Light

Liner & Lashes
  • Ardell Inspired Lashes
  • Cover Girl Clump Crusher Mascara
  • Elf Black Liquid Liner
  • Milani Liquif'Eye Liner Pencil in Black
  • L.A Girl Metallic Blue Liner

Check out other My Little Pony Looks : Rainbow Dash, Twilight Sparkle, Fluttershy, Rarity, Pinkie Pie, Sweetie Belle, Spike Applejack, Scootaloo, princess Celestia, Lyra, Apple Bloom and Nightmare Moon

That's all for this look! Did you enjoy this one even though it's kind of wild? Also, would you like to see more step by step like this? Let me know in the comments :D

Don't forget to follow me and like my Facebook page for more posts like this ♥
 

Tuesday, 12 November 2013

The Hunger Games Inspired Makeup Series : District 6 (Transportation and Morphlings)

Hey everyone! Today I have another makeup look inspired by the Hunger Games to share! This time it's inspired by district 6! The main industry of district 6 is transportation. It is also a district that has struggled with morphling addiction following the horrors that certain contestants have faced during the games. Since I wasn't too inspired by the transportation theme on its own, I thought I would combine both to create a look that best represents the district's most characteristic features.

As far as transportation is concerned, it inspired me to create a slate grey and black look on the upper lid to represent the color of the roads and tires. For the morphling aspect I went with a bright rainbow underneath the eye.


Products used :

Base
  • UDPP
  • NYX Jumbo Eye Pencil in Milk
Eyeshadow & Brows
  • Bh Cosmetics 120 Color Palette (1st Edition)
  • NYX Casting Call Palette
  • Stila In The Light Palette
  • Milani Brow Fix Brow Kit in Light
Liner & Lashes
  • NYX 109 Rebel Lashes
  • Cover Girl Clump Crusher Mascara
  • NYX Jumbo Pencil in Milk
  • E.l.f. Black Liquid Liner

Don't forget to follow me and like my Facebook page for more posts like this ♥

Monday, 11 November 2013

NYX Mega Shine Lip gloss Review and Lip Swatches

Hey all! Today I'm reviewing the NYX Mega Shine Lip Glosses for you. I recently purchases two of their lip glosses because I had been wanting to try them for ever! I finally cracked and got them online so I could try them out. I know a lot of people love these on Youtube, so I thought I would tell you what I thought of them.

Review
NYX  Mega Shine Lip Gloss in Natural and Plush Red

Color payoff : The two lip glosses I own have a very good color payoff, but the Plush Red shade really stands out. It's pretty much opaque and will give you a red lip with no red lipstick underneath. I think it's fantastic! The natural shade is made to be, like the name says, more natural looking, so it's a bit more sheer, but it stills offer a good amount of color on the lips.

Texture, Application and Wear : These apply very smoothly to the lips. They're not too sticky, just enough so that they stay on a little while. I wouldn't say these wear exceptionally long since they are, after all, lip glosses. My guess is they would wear about 2 hours without touching up if you don't eat or drink.

Finish : They look very glossy on the lips, especially the plush red shade. Both are a cream finish, meaning that they do not contain glitter or shimmer. That's usually how I prefer my glosses. I believe other shades from this range contain shimmer, but the two I have don't.

Packaging : The packaging is simple and practical. They have a little bow at the top of the cap which is think is a very cute touch. I quite like the packaging.

Scent : The scent of these lip glosses is what I was kind of concerned about before I received them. The reason being that many people on Youtube say that they hate the smell. The smell of the NYX Mega Shine Lip Glosses is quite strong and I understand why some people might not enjoy it. It's a very sweet cherry smell. Personally, it doesn't bother me, and I don't smell it once it's on my lips. If you're very sensitive to smells, you might not like this product though.

Price : 5$ each

Overall : I'm very happy with the NYX Mega Shine Lip Gloss shades that I got and with the quality of these glosses in general. I'm thinking of getting more in the near future. I'm not much of a gloss wearer, but since the glosses aren't too sticky, I find them quite comfortable to wear. 8.5/10

Lip Swatches
Natural 

Plush Red

---

That's all for today's review, I hope this helps! Let me know if you've ever tried NYX Glosses!

Don't forget to follow me and like my Facebook page for more posts like this ♥

LinkWithin

Related Posts Plugin for WordPress, Blogger...