Showing posts with label Beginner. Show all posts

Monday, 10 March 2014

Photo Editing 101 : How I Edit my Makeup Photos

Hey everyone! Today I have a bit of a different post to share with you all. In the last year, I have started familiarizing myself more with photo editing. The reason for that is because I was never completely satisfied with how my makeup pictures turned out. Mostly, it was the lighting that was never right, but as I started knowing more and more about it, I started realizing that some other aspects of my pictures needed a bit of polishing. It took a lot of time, trial and error to get to the point that I am now and it's been a learning experience for me since I taught myself how to do it. Anway, I'm quite pleased with the quality of the pictures that I'm able to produce now so I thought I would share my process in case any of you is interested or trying to get into photo editing.

*Disclaimer* I photoshop my pictures, but I rarely ever touch the makeup itself. I only polish the raw edges, meaning any imperfection or lighting issues. If you're looking for a tutorial on how to photoshop lashes or colors or anything like that, this post won't help you very much, sorry!

First, like I mentionned, I use photoshop CS6 for my photo editing. It's kind of complicated to learn at first, but it's really the best editing tool for me. I'll take you step by step with me while I edit this photo to achieve the after picture that you see below.
1) Cropping the picture
The key to a nice makeup picture is cropping out anything that isn't necessary so to keep the focus on the makeup look. Of course if you're doing a full face makeup look than you won't crop as much as I do.
This is the raw picture, cropped. It's not horrible, but it could use some polishing. Notice that the only thing in the picture is my eye and brow so not to distract from the focus of the picture. (not showing the uncropped picture because you can basically see up my nose and I'm so not sharing that!).

2) Fixing the lighting and coloring of the picture
I use a few of Photoshop's features for this. First I use the Auto Tone option. Then, I always fade that to about 50% because the toning is a little harsh with the kind of lighting that I'm using to shoot my pictures. Then, I use the Auto Contrast option. This is the result.

Next I use the Exposure feature and crank up the exposure of the picture a little. I also increase the gamma slightly and then I increase the offset a tiny bit so not to lose the intensity of my liner and lashes. Bascially I'm brightening the overall picture, but keeping the darker colors intense so that I get a good contrast.

As you can see, the difference so far is slight, but it's nicer to look at already. Lastly for the coloring, I use the Vibrance option and crank it up a little bit. I also increase the saturation slightly. This makes my colors pop more.

3) Erasing Imperfections
Now we're getting to the fun part (at least in my opinion), perfecting the skin, eyes and brows. First I like to remove the veins and lashes that are in my eyes using the Patch Tool (some of my lashes have a tendency to grow downwards which looks super ugly in photo).

We're looking much better already! Now it's time to tidy up those eyebrows! I use the same Patch Tool to remove any unwanted hairs. I tweeze my brows every time I do a makeup look like this. Howeverm since I use the flash to take pictures and since it's such a close shot, you can see every single little hair I missed and all the blonde ones. I feel like it looks untidy so I like to remove them.

Next, I give the whole picture a little once-over and still with the Patch Tool, I fix any other little imperfections that I might see. The difference is subtle in this one. Can you spot the differences with the last picture?

After that, I like to perfect my skin. I don't always do this, especially if my skin is looking relatively good that day, but lately I've been doing it, so I'll show you how. I use the Eyedropper Tool to select a shade of skin that is near my eye. Then, with the Brush Tool (Opacity : 25%, Flow : 25%) I simply go over my skin once all around the eye to soften the look of the skin. It retains part of the texture of the skin because of the opacity, but it still covers up and evens out the skin a little.

Last, you can brighten up your eye color using the Dodge Tool (Exposure : 40%). This is totally optional, but I like to do it every once in a while!

---

That's it! That's all I do to edit my makeup pictures! As you can see I haven't touched the makeup itself, but it still looks 100 times better! Hope you enjoyed this and that it was helpful! Does any of you guys edit your photos? If so, do you have any other tips and tricks for me? Let me know!

Don't forget to follow me and like my Facebook page for more posts like this ♥

Friday, 15 November 2013

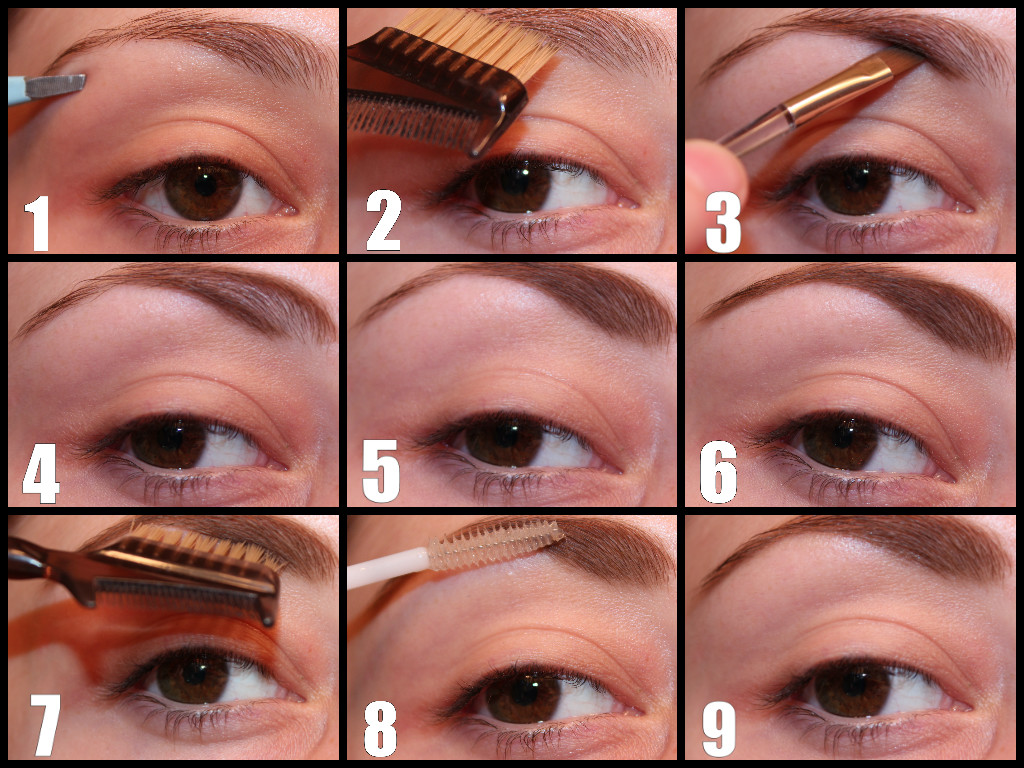
Beginner Series : How To Fill In Eyebrows - Step By Step Tutorial

Hello everyone! Today I'm back with my beginner series! Today I thought I would share my tips and tricks as well as a step by step tutorial on how I fill in my eyebrows! My method is quite easy and quick and really makes a difference. Keep reading if you're interested to see the tutorial :)


- Brow powder that matches your brows. I believe if you have light hair you need to go a few shades darker and if you have dark hair it's the opposite, but don't quote me on that! For my color, I went with trial and error. I use this Milani Brow Fix Kit and I mix both brown colors to achieve a color that I like.
- An angled brow brush. I like to use the one that comes with the kit, but you can use any one that you have.
- Tweezers
- Clear brow gel, I like to use clear mascara for this purpose. As you can see mine is starting to look brown and gross, but it's still works the same.
- A brow comb
- A shimmery highlight shade

How to Fill In Your Eyebrows

1) Tweeze any stray hairs.
2) Comb the lashes so that no hair is sticking out.
3) Using the angled brush and the brow powder in your chosen color, start filling the brow at the base on the brow. I like to fill in the front on my brows first and the tail last because that's where I apply the most product. Use short strokes to get the effect of hairs.
4) Using the same technique, now define the upper portion of the brow.
5) Fill it in.
6) Finish by filling in the tail of the brow.
7) Brush the eyebrows into place again. This will help reduce the appearance of drawn on brows and make it look more natural by getting rid of any excess product.
8) Using the brow gel, apply a small amount to the brows to help seal the product as well as keep them in place during the day.
9) This last step is optional, but if you want to further define the brow, you can use an angled brush and apply a light shimmery shade close to the brow on the brow bone.


---

That's all! You're brows are now groomed and ready for the day. Pretty easy right? Let me know if this tutorial was helpful to you!

Don't forget to follow me and like my Facebook page for more posts like this ♥

Friday, 31 May 2013

Latest Makeup Look Faves Recap

Hey everyone!

I've been really into creating all kinds of dramatic, colorful looks lately. A lot of them I'm really pleased with so I thought I would do a quick recap of my latest faves!

Let me know what you're favorites were :D

Weee so many colors :D

Don't forget to follow me and like my Facebook page for more posts like this ♥

Wednesday, 15 May 2013

Beginner Series : Applying False Lashes in 10 Easy Steps

Hey everyone! Today, I'm back with another advice post for beginners : how to apply fake lashes. Many girls (including me) struggle with applying false lashes at first. With a little practice I've developed a few tips and tricks to make my life easier so I'm sharing them with you today!

---
What you need
- Tweezers
- Eyelash Glue
- Fake lashes
- Black gel or liquid liner
- An object that you can put glue on. I use a concealer.

---

Choosing your lash glue 

Brand : The first thing to keep in mind when buying a an eyelash adhesive is the brand. Not all brands perform equally therefore choosing a high quality glue will give you better results.

Eye Sensitivity : Some brands can be irritating for your eyes. In my experience, the glue sometimes included with Ardell lashes does this, it stings my eyes so it doesn't work for me.

Color : Lash glues come in either clear or black. If you are a beginner, it's easiest to stick to clear to avoid getting black glue all over your lid while you work on getting them placed correctly.

With all of this said, my favorite glue is the Duo Clear Eyelash Glue.  It's fairly around the 6$.

---

Applying False Lashes in ten steps

1. Finish your makeup look as you normally would with liner and mascara.

2. 
Apply some glue on your chosen object. Let it sit for ~30 seconds until it becomes a bit tacky.
3. Pick up the lashes with tweezers and apply the glue uniformly onto the lash band.


4. Before applying, hold the lashes in front of your eye and adjust the lashes' placement.

5. Once you have adjusted the placement, stick the middle portion of the lash on the center of your lid as close as possible to your lash line. Then, stick both ends as well.

6. Adjust the lashes while the glue is still wet to ensure proper placement.

7. Let it sit for 10-15 seconds.

8. Using your thumb and index finger, press the lashes with your own natural lashes to ensure that they blend well with your lashes and that they are secure.

9. Let the glue dry for a couple minutes. It should become clear mostly clear, but it may affect the look of your eyeliner underneath. No worries, we can fix it with a little eye liner.
10. Make sure that the lash band is hidden by applying liner wherever the band is noticeable.

---
Removing the lashes

The best way to remove lashes is with makeup remover and a cotton bud. I advise against pulling them off since it can damage the sensitive skin on your eyes as well as your natural lashes. 

To remove lashes, I saturate a cotton bud with makeup remover. Then, I hold it at the base of my lashes for a few seconds so that the makeup remover has time to loosen the glue. After that, I carefully rotate the cotton bud near my lash line until the lashes come off on their own. Here is a little video showing the technique I use.

The video quality isn't all that great, sorry about that!
Gotta figure out how to work my camera's video mode.

---

Caring for your lashes

If you plan on reusing your lashes more than once (which I usually do), you need to care for your fake lashes in order to keep them nice and in good shape. Here are a few tips to help you make sure that you care for your lashes well.

- Don't pull off the lashes. It can be damaging your your sensitive eye area as well as the lashes.
- Try to avoid putting mascara over the lashes. Apply mascara beforehand.
- Remove any glue that is stuck to the lash band using tweezers.
- Keep your lashes in their original packaging when you store them.

----

That's all for this advice post! I hope it helps and that you enjoyed this :) Let me know in the comments if you'd like to see more beginner posts and what you'd like to see!

Don't forget to follow me and like my Facebook page for more posts like this ♥

Tuesday, 7 May 2013

Beginner Series : Easy Neutral Look with a Pop of Color Tutorial

Today I'm sharing a tutorial for this easy wearable makeup look!

It's a neutral look with a hint of blue on the lower lash line.  It's super easy and uses inexpensive drugstore products. It's great for everyday wear and perfect for a warm summer day! If you would like to know how to recreate this look, keep reading ♥

---

What you need
If you want more information, most of these products are featured in my Drugstore Starter Kit.


How to achieve it

1. Pat a light shimmery beige color all over the lid using a flat shading brush.
(Left browbone color from the Comfort Zone palette)

2.
Using a fluffy brush, place a medium bronze shimmery color in the crease using a windshield wiper motion. (Left eyelid color from the Comfort Zone palette)

3.
With the same brush, apply a darker shimmery brown to the outer corner. Blend into the outer portion of the crease. (Left crease color from the Comfort Zone palette)

4.
Using a small brush, apply the blue color on the lower lash line going all the way in to the inner corner. (Right eyelid color from the Blue Had Me At Hello palette)

5.
Line the waterline using a black pencil liner. Line the upper lash line using a black gel or liquid liner. Add Mascara.

---

You're done! It's another super quick and easy look to recreate. I hope you give it a try! Let me know what you think of this look in the comments :)

Don't forget to follow me and like my Facebook page for more posts like this ♥

Sunday, 21 April 2013

Beginner Series : Easy Lilac Eyes for Spring

Hello everyone, I'm back with another tutorial for my beginner series :)

This is a pastel, lilac with blue look inspired by a request I got on my Facebook Page. Thanks for the request Victoria, I love to know what you all want to see! ♥

I'm trying out a new format for my tutorial, a kind of collage inspired thing. Let me know if you like this and if this is easier to follow.

This is the look I'll show you how to recreate :


---

Material

---

Tutorial

Step 1 : Start with a clean surface.
Step 2 : Apply a white shadow base to the lid.
Step 3 : Blend out the base with your fingers.
Step 4 : Pat on a pale purple color to the first 2/3 of the lid.
Step 5 : Apply a darker Purple shadow to the outer corner in a triangular shape. Blend the two lid colors together slightly using the same brush.
Step 6 : Using a shimmery pale purple, highlight the inner corner.
Step 7 : Using a medium shimmery blue, blend out the dark purple and apply to the crease.
Step 8 : Apply a blue toned purple to the lash line.
Step 9 : Apply liner, mascara and falsies (optional).

--- 

That's all for this look! I hope you enjoyed it and that the tutorial was helpful :)
Don't forget to follow me and like my Facebook page for more posts like this ♥

Thursday, 11 April 2013

Beginner Series : Easy Wearable Smokey Eye Tutorial

Hello everyone. Today I have an easy smokey eye tutorial for you all! To make it even easier for beginners to follow, all the products I'm using are from the Beginner drugstore Starter Makeup Kit I have posted a few days ago. That means that the look uses minimal products and is very affordable. Therefore anyone can achieve this easily! Let's start with the tutorial :)

In this tutorial I'll show you how to achieve this
easy smokey eye look!


For this look, I'm using the Wet n Wild Silent Treatment trio. It's the perfect everyday smokey eye in my opinion. 

This is an easy tutorial, in fact I'm using the color exactly how the company suggests you use it. The taupe on the lid, the dark brown in the crease and the pink for the brow bone.

Keep reading if you would like to learn how to achieve this super easy smokey eye! ♥

---


Step 1 

Using a flat shading brush, apply the purple-taupe color all over the lid. The ideal way to apply this color to get it to be saturated and as pigmented as possible is to apply it using a patting motion. You can prime the eye using concealer underneath to get an even better result. Don't go all the way up in the crease, really keep the color concentrated on the moving part of the lid.


 Step 2 

 With the same brush, apply the color to the lower lash line going all the way to the tear duct.


Step 3

Using a fluffy blending brush, apply the dark brown using a circle motion. Concentrate most of the color in the outer part of the lid. Gradually bring the color into the crease and then using a windshield wiper motion, bring the color forward. Clean the brush using a tissue and the start blending the edges again with the same technique. Try not to bring the color up too much.


Step 4

Clean off the remaining taupe shadow from the flat shading brush. Now using the pink shimmery color from the palette apply the color to the brow bone area. You can also apply it to the tear duct area to make the eyes looks brighter, bigger and more awake (se the same brush for that process as well). In this tutorial, I chose to highlight the tear duct.


Step 5 

Using a soft black liner pencil, line the upper lash line as close as possible to the lash line. Bring the liner about three quarters of the way in. It doesn't have to be perfectly smooth at this stage. Then, using an angled brush, smudge out the liner to make it even and a little softer. The end result should be subtle. You want to accentuate the lash line to make your lashes look fuller, but you don't want the liner to be obvious for this look.

I'm using Milani Liquif'Eye liner for this step.
It will set it you let it sit for a while, but it is soft
to begin with, which allows you to smudge it out a bit.
This is the brush I'm using to smudge out the liner

Step 6

Add your favorite mascara to the upper and bottom lashes to finish up the makeup. I have chosen the Cover Girl Clump Crusher Mascara for this look. You can also conceal underneath your eyes now if you hadn't before. I recommend waiting after your done to do it since you might get some fallout with the darker Wet n Wild shadows.


---

Here is the finished look ! It's quite subtle and wearable for a smokey eye which is what I love about this palette. It's easy and great for everyday!


That's it for this tutorial! Let me know in the comments if you have any other suggestions on beginner tutorials or tips you would like to see.

Don't forget to follow my blog and like my Facebook page if you enjoyed this ♥


Sunday, 7 April 2013

Beginner Series : Drugstore Starter Makeup Kit

Hey everyone! Today I'm introducing a brand new series here on my blog : a beginner series. I will be posting tutorials on makeup basics for anyone starting out ! I'll include also include  a few easy everyday makeup tutorials.

First, this post is a drugstore starter makeup kit. I'll take you through all the basic makeup items you may need in your makeup collection when you start out with makeup. These are the items that will be used in future tutorials to create everyday looks.
---


These are all the products I am recommending today. Of course, you can add or substract products from this list according to your needs and preferences.

---

Face Makeup

1) Moisturizer : First you will need a good moisturizer that is well suited to your skin type. I use Garnier Ultra-Lift day cream. It's quite hydrating so it might not be the most suited for oily complexions.

2) Oil-Absorbing Sheets : If you get oily during the day, oil absorbing sheets such as these from Clean & Clear are the best to keep your skin from getting shiny without smudging the makeup underneath. 

3) Foundation : Liquid foundation helps even out the skin. You can also mix it with moisturizer for a natural look. My favorites are : Revlon ColorStay : Flawless look, high coverage, matte finish and Maybelline Instant Rewind : Natural, light coverage, dewy finish.

4) Finishing Powder : Powder will help the foundation set and stay on all day. This Stay Matte Powder from Rimmel is great and doesn't look powdery.

5) Blush : blush livens up your complexion and make you look healthy and glowing. Wet n Wild have incredibly pigmented and super affordable blushes. One of my favorites is the color Heather Silk.

6) Bronzer : Contrary to popular belief, you don't need to be tanned to pull off bronzer. The key is to find a shade that suits your skin tone and that isn't too dark or orange. I like the N.Y.C Sunny Bronzer for my skin. 

7) Concealer : Concealer hides blemishes and discoloration on the skin.  To choose a concealer you must consider where you want to apply it. Blemishes require a thicker consistency while the under eye area needs the opposite. My favorite is Maybelline Mineral Power.

8) Face brushes :  For foundation, you can either use a brush for an airbrushed effect, or your hands for a more natural look. I like the Real Techniques Expert Face Brush because it's soft and it buffs the foundation in really well. For powders, I recommend the multipurpose Eco Tools Blush Brush.

---

Eye Makeup

1) Eyelash curlers : Not everyone like eyelash curlers, but if you have straight lashes like me, it really does make a difference and helps make your eyes look bigger. This is a Revlon Eyelash curler.

2) Eye shadow : Neutrals are the easiest pull off so I recommend starting out with those. I recommend Wet n Wild shadows. They are  affordable, easy to apply and the most pigmented drugstore shadows I have ever come across. My favorites : Silent Treatment, Comfort Zone and Walking on Eggshells.

3) Mascara : No eye look is complete without mascara, but everyone's preferences for mascara differ so it's impossible to recommend one that everyone will love. Finding what you like is often a trial an error process and you may need to try a few before your find one your like. My current favorite is the Clump Crusher mascara. It's separating and volumizing.

4) Liner : For beginners, I recommend a pencil liner for the waterline and liquid liner for the upper lashline (in black or brown). My favorite pencil, Milani's Liquif'Eye Liner, has great staying power and is very dark. For liquid liner, here I have a good one by N.Y.C., but  my fave is L'Oréal Lineur Intense Felt Tip Liner.

5) Eye Brushes : Brushes are the key to a successful eye makeup look.The three brushes I'm recommending are all Eco Tools. I recommend a fluffy blending brush for blending out eye shadow, an angled liner brush for brows or lining the eyes and a small flat shading brush for patting on eye shadow.

---

Lips

1) Lipstick : You need a color that is wearable and that isn't too different from your natural lip color. That way you are sure that it will compliment your skin tone. It's also easier to apply when you're not used to applying lipstick.

For me, the color I chose is B52 by NYX. Their lipsticks glide on the lips and are very moisturizing.

2) Lipbalm : Everyone needs a good lipbalm, right? This babylips lipbalm has SPF 25, is super smooth and leaves the lips silky feeling.

3) Gloss :  This is optional  but if you like a glossy pout, you'll need at least one lip gloss in your collection.  Here, I'm presenting two different ones, a sheer shimmery one (Forever 21) and pinky more opaque one (BonneBell).These two lip glosses would suit most everyday looks.

---

That's all I'm recommending for a beginner starter makeup kit! Everything is very affordable and will help you achieve a full face of makeup without breaking the bank! These are some of my favorite products because of the quality and value for the money. I hope this post has helped! Let me know in the comments if this was any help to you!

Don't forget to follow my blog and like my Facebook page for more beginner friendly makeup posts soon!

LinkWithin

Related Posts Plugin for WordPress, Blogger...