Showing posts with label affordable. Show all posts

Sunday, 27 July 2014

Korean Beauty Store Haul

As some of you might already know if you've read my last post, I found a Korean beauty store in my local china town. I'm really excited about this, I had no idea we had any! I was kind of overwhelmed by the discovery and I'm still doing the 10$/week budget for makeup so I didn't go too crazy, but I did pick up a few things! The makeup items will be included in my 10$/week budget which I will update you all on very soon!


  • Darkness lashes - They had a bunch of lashes at the store. They were only 4 to 5 $ a piece, really affordable! I haven't tried them yet since I don't have any lash glue on hand at the moment, but I'll update you all on what I think soon! :)
  • Crystal Jelly Cheek Pot in the color 01 by Tony Moly - the texture of this blush is crazy odd, but so far I'm loving this product! It's now in my makeup bag and I use it everyday. I think I'd like to pick up a few more colors and make a full review. Anyone interested?
  • Party Lover Liquid Eye Liner by Tony Moly - OMG this eyeliner! It's going into my monthly favorites for sure <3. I didn't know about the Tony Moly brand, but I'm mad impressed!
  • Nail polish remover - nothing too exciting, I needed some and I decided to try this one because it was cheap :)
  • Sheet masks - I'm so excited I finally got  my hands on sheet masks! I've seen people rave about them forever now. Can't wait to try them out <3
---

That's all I got at the Korean beauty shop but I'm saving my budget to go back and pick up some BB cream a glitter liner and a bunch more probably! Let me know if there are any Korean specific brands or products that I should try! Everything looks so cute and awesome :D

Thursday, 19 June 2014

Summer Series : Tropical Fiesta Makeup Look

Hey all! Here is another fun summer look for you all! It's not really inspired by anything, but the colors remind me of tropical islands and feel good beach parties. It's super colorful and I'm really liking it. Hope you all enjoy! Let me know if you have any suggestions for more looks in the future! ♥


Products used :

Base
  • UDPP
  • NYX Jumbo Eye Pencil in Milk

Eyeshadow & Brows
  • BH 120 Palette (1st Edition)
  • Urban Decay Naked Basics Palette
  • Milani Brow Fix in Light

Liner & Lashes
  • Red Cherry #28 Lashes
  • Cover Girl Clump Crusher Mascara
  • L'Oréal Infallible Lacquer Liner in Very Black
  • Urban Decay 24/7 Glide on pencil in Sabbath
---

Don't forget to follow me and like my Facebook page for more posts like this ♥

Monday, 9 June 2014

Fun Wearable Summer Night Makeup using Darling Girl Cosmetics

Hey everyone! It's been a while since I've busted out my DGC shadows last, so I felt like having a little fun with them the other night. Since the weather has been nicer recently, I've been inspired to do more summer appropriate looks. Now this look is quite deep and dark, but with the shimmer and the hint of purple, I feel like it would be great for a summer night out. Let me know what you think!


I'm not entirely sure I remember the shadows I used to do this. I think I did L'Oréal Infallible Shadow in Tender Caramel as a base all over the lid and then I built over that. I think I did Dark Heart and Dark Crystal in the crease and outer corners and Beluga Bebe on the inner lid, but I could be wrong! Sorry about that :S I totally forgot to make notes of the colors I used. :( Hope you still enjoyed this! 


Don't forget to follow me and like my Facebook page for more posts like this ♥

Sunday, 29 December 2013

Drugstore Wearable Series : Using NYX Casting Call Palette (Party Makeup)

Hey all! I have another affordable drugstore makeup to share with you all today. It's another wearable and neutral party makeup look perfect for the holidays, especially New Years which is coming up really soon! I hope you enjoy this look! Let me know in the comments if you'd wear something like this to an holiday party! ♥


Products used :

Base
  • NYX Eye Shadow Base in Nude
  • Maybelline Color Tattoo in Bad to the Bronze

Eyeshadow & Brows
  • Milani Brow Fix in Light
  • NYX Casting Call Palette
Liner & Lashes
  • Ardell 315 Accent Lashes
  • Cover Girl Clump Crusher Mascara
  • L'Oréal Gel Liner in Blackest Black
  • Milani Liquid Eye Liner Pencil in Black

Don't forget to follow me and like my Facebook page for more posts like this ♥

Tuesday, 24 December 2013

12 Days of Christmas : (Technically Not) Drugstore Wearable Series - Using Darling Girl Cosmetics (Party Makeup)

Hey all! Today I have another wearable makeup look for this series, using Darling Girl Cosmetics Loose Shadows! Technically this one is not drugstore, but the price point is very affordable which is why I'm including it in this series. I'm also making this a party makeup since I made this for the 12 Days of Christmas I'm currently running on here! Basically, it's a wearable, neutral (with just a hint of color, because you know how DGC shadows are ;) ) party look perfect for the holidays! Hope you enjoy this!


Products used :

Base
  • NYX Eye Shadow Base in Nude

Eyeshadow & Brows
  • Darling Girl Loose Shadows :
- Mordid Angel in the inner corner
- Beluga Bebe on the middle of the lid
- Impervious in the outer corner
- O Rly? in the crease and lower lashline

Liner & Lashes
  • Ardell 315 Accent Lashes
  • Cover Girl Clump Crusher Mascara
  • Rimmel Eye Khol in Nude
  • E.l.f. Liquid Liner in Black

Don't forget to follow me and like my Facebook page for more posts like this ♥

Tuesday, 10 December 2013

Drugstore Wearable Series : Using Annabelle Creme Caramel Trio

Hiya everybody! Today I have another makeup look that is wearable and affordable! I did a pretty bronzey neutral eye using the Annabelle Crème Caramel Trio Eyeshadows. I decided to go with brown liner to complement this soft and subtle so it's perfect for day time! Let me know what you think of this look in the comments below :)


Products used :

Base
  • NYX Jumbo Eye Pencil in Yogurt

Eyeshadow & Brows
  • Milani Brow Fix in Light
  • Annabelle Creme Caramel Trio:
- Shimmery Beige Color in the middle of the lid and under the brow
- Medium Caramel Color all over the lid
- Medium warm toned brown shade in the crease on the lower lash line

Liner & Lashes
  • Ardell 315 Accent Lashes
  • Cover Girl Clump Crusher Mascara
  • Stila Smudge Stick (brown)
  • Maybelline Eyestudio gel liner in brown

Don't forget to follow me and like my Facebook page for more posts like this ♥

Monday, 9 December 2013

L'Oréal Infallible Lacquer Liner in Blackest Black Review and Swatches

Hey everyone! Today I have a review on the L'Oréal Infallible Lacquer Liner. I picked it up recently because I was wondering how it would compare to other drugstore gel liner that I have tried. Also, my Wet n Wild Gel liner dried up on me a couple months ago so I have been using mostly liquid since then. I wanted to get back into gel liner because I love how it looks so I decided to give this one a try. I have been playing around with it for a little while now so I decided to review it for you all, in case any of you are looking to try out a new gel liner from the drugstore!

Review


Packaging : I quite like the packaging. It feels durable and closes tightly. The glass jar makes the packaging looks almost a bit fancy which I like. My only concern with it is that the metallic gold lid of the jar get dirty really quickly. As you can see, mine already has a bunch of fingerprints on it and I haven't owned it that long.

Color payoff : This liner is as black as you can get it one single swipe. I'm quite impressed by how dark it is. It really makes your eyes pop when applied.

Texture, Application and Wear : This gel liner is exceptionally creamy and it glides on easily when applied with a fine liner brush or an angled brush. So far, it seems to wear nicely, without rubbing or flaking off like some liners do. It remains as intensely pigmented all day as when you first apply it. What I have yet to discover though is how quickly this product dries out. I used to love my Wet n Wild cream liner, but it dry up on me in only a couple months. I will keep you posted on that later on.

Finish : This liner has a matte finish.

Price : 10-12$ depending on where you buy it.

Overall : I'm not 100% sure how much I like this yet, just because I don't know if it'll dry up quickly. If it does, than I'd rather spend 3$ on a Wet n Wild one instead of 10-12$. If it doesn't than I'll gladly pay a little more to be able to use more of my product. Other than that, I'm thrilled with this gel liner. The pigmentation is fantastic and it's the creamiest Drugstore Gel Liner I have tried so far. It is a little bit on the pricey side for a drugstore product, but most gel liners I have seen are around the same price point (the Maybelline Eye Studio one is also 10-12$) so I guess it's alright. I definitely recommend it if you're looking for a nice drugstore gel liner that is very creamy and very black. 9/10

Swatches


That's all for today's review! I hope this was helpful to you all! Have you tried this gel liner? What did you think? Let me know in the comments!

Don't forget to follow me and like my Facebook page for more posts like this ♥

Sunday, 8 December 2013

Drugstore Wearable Series : Using Quo Grace And Glamour Beauty Box

Hey all! Today I'm doing another wearable look using drugstore makeup only! This time I'm using the Quo Grace and Glamour Beauty Box. It's a little more dramatic than my previous look using the Sunbaked Neutral Palette by Maybelline, but it's still definitely wearable, especially for a night out. I love the way this turned out, the colors combined with the elongated eye shape kind of remind me of an arabic inspired makeup. Would you wear something like this? Let me know in the comments!


Products used :

Base
  • UDPP
  • NYX Jumbo Eye Pencil in Milk

Eyeshadow & Brows
  • Milani Brow Fix in Light
  • Wet n Wild Blue Had Me At Hello (black shade to smoke out the liner)
  • Quo Grace and Glamour Beauty Box :
- Shimmery Champagne shade on the inner third of the lid
- Gold color on the middle of the lid
- Reddish Copper Shade on the outer corner
- Mix of Green and turquoise shades in the crease
- Matte beige shade under the brow

Liner & Lashes
  • Cover Girl Clump Crusher Mascara
  • Milani Liquif'eye Eyeliner Pencil - Black
  • E.l.f. Liquid Liner in Black

Don't forget to follow me and like my Facebook page for more posts like this ♥

Friday, 6 December 2013

Drugstore Wearable Series : Using Maybelline Natural Smokes Palette

Hey all! I'm back with another drugstore wearable look for you today. This time, I created it using the popular Natural Smokes palette by Maybelline. I created a subtle smokey eye, perfect for everyday wear. I really enjoy this look, would you wear this? Let me know in the comments!


Products used :

Base
  • NYX Eye Shadow Base in Nude

Eyeshadow & Brows
  • Milani Brow Fix in Light
  • Maybelline Natural Smokes Palette :
- Matte Beige shade under the brow
- Shimmery Taupe color all over the lid and inner lower lash line
- Dark bronze shade in the crease
- Deep cool toned matte brow shade to darken the crease and outer corner

Liner & Lashes
  • Ardell 315 Accent Lashes
  • Cover Girl Clump Crusher Mascara
  • Rimmel Eye Khol in Nude
  • L.A Colors Black Liquid Liner with silver sparkle

Don't forget to follow me and like my Facebook page for more posts like this ♥

Saturday, 30 November 2013

Drugstore Wearable Series : Using Maybelline Sunbaked Neutrals Palette

Hey all! Today I'm starting a new series that will concentrate on wearable and/or neutral looks using drugstore eye shadow palettes, duos, trios and quads only! I've been doing a lot of very colorful, not so wearable looks recently (Disney Series, My Little Pony Series, Hunger Games Series, etc.), so I thought it would be a nice change of pace to go ahead and do wearable looks! 

Also, since I'm a drugstore makeup enthusiast, I decided to make this series drugstore only so that anyone can recreate them easily, no matter the budget! 

Today I'm starting with a Maybelline Palette that I really love : Sunbaked Neutrals! It's super convenient and portable and I love the color selection. Here's the look I came up with! Super wearable and pretty! What do you think? Would you wear something like this?


Products used :

Base
  • NYX Jumbo Eye Pencil in Yogurt

Eyeshadow & Brows


  • Milani Brow Fix in Light
  • Maybelline Sunbaked Neutrals Palette :
- Light shimmery beige color on the inner corner
- Light Green color on the inner third on the lid
- Deep Green color on the rest of the list
- Light Copper color in the crease
- Dark Bronze color on the outer v and outer part of the lower lash line
- Light brown shade on the inner part of the lower lash line
- Matte Beige color to highlight the brow bone

Liner & Lashes
  • Ardell 315 Accent Lashes
  • Cover Girl Clump Crusher Mascara
  • Rimmel Eye Khol in Nude
  • E.l.f. Liquid Liner in Black

Don't forget to follow me and like my Facebook page for more posts like this ♥

Tuesday, 19 November 2013

Recent Favorite Lip Combo : Revlon + NYX

Hey all! Recently, I've been obsessed with a new lip combo. I think these two products look fantastic together and are great for everyday wear, so I thought I would share it with you all!

I've been wearing Revlon Just Bitten Kissable Lip Stain in Honey with NYX Mega Shine Lip Gloss in Natural over top. 

I just love how it looks! Natural and a little glossy. Super comfortable on the lips! What do you think, would you wear this combo? Let me know in the comments!

---

Don't forget to follow me and like my Facebook page for more posts like this ♥

Friday, 15 November 2013

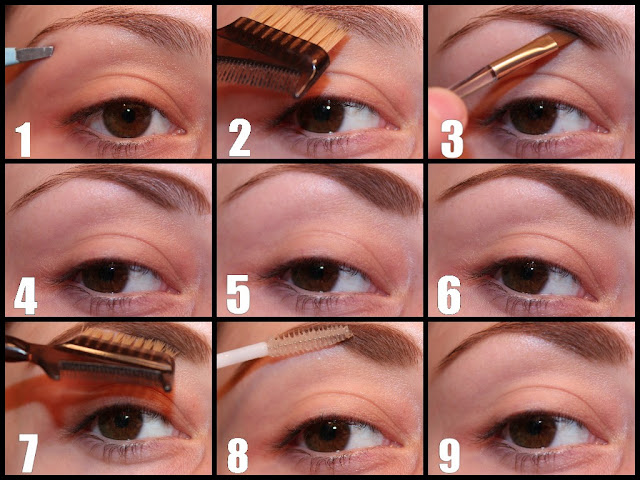
Beginner Series : How To Fill In Eyebrows - Step By Step Tutorial

Hello everyone! Today I'm back with my beginner series! Today I thought I would share my tips and tricks as well as a step by step tutorial on how I fill in my eyebrows! My method is quite easy and quick and really makes a difference. Keep reading if you're interested to see the tutorial :)


- Brow powder that matches your brows. I believe if you have light hair you need to go a few shades darker and if you have dark hair it's the opposite, but don't quote me on that! For my color, I went with trial and error. I use this Milani Brow Fix Kit and I mix both brown colors to achieve a color that I like.
- An angled brow brush. I like to use the one that comes with the kit, but you can use any one that you have.
- Tweezers
- Clear brow gel, I like to use clear mascara for this purpose. As you can see mine is starting to look brown and gross, but it's still works the same.
- A brow comb
- A shimmery highlight shade

How to Fill In Your Eyebrows

1) Tweeze any stray hairs.
2) Comb the lashes so that no hair is sticking out.
3) Using the angled brush and the brow powder in your chosen color, start filling the brow at the base on the brow. I like to fill in the front on my brows first and the tail last because that's where I apply the most product. Use short strokes to get the effect of hairs.
4) Using the same technique, now define the upper portion of the brow.
5) Fill it in.
6) Finish by filling in the tail of the brow.
7) Brush the eyebrows into place again. This will help reduce the appearance of drawn on brows and make it look more natural by getting rid of any excess product.
8) Using the brow gel, apply a small amount to the brows to help seal the product as well as keep them in place during the day.
9) This last step is optional, but if you want to further define the brow, you can use an angled brush and apply a light shimmery shade close to the brow on the brow bone.


---

That's all! You're brows are now groomed and ready for the day. Pretty easy right? Let me know if this tutorial was helpful to you!

Don't forget to follow me and like my Facebook page for more posts like this ♥

Monday, 11 November 2013

NYX Mega Shine Lip gloss Review and Lip Swatches

Hey all! Today I'm reviewing the NYX Mega Shine Lip Glosses for you. I recently purchases two of their lip glosses because I had been wanting to try them for ever! I finally cracked and got them online so I could try them out. I know a lot of people love these on Youtube, so I thought I would tell you what I thought of them.

Review
NYX  Mega Shine Lip Gloss in Natural and Plush Red

Color payoff : The two lip glosses I own have a very good color payoff, but the Plush Red shade really stands out. It's pretty much opaque and will give you a red lip with no red lipstick underneath. I think it's fantastic! The natural shade is made to be, like the name says, more natural looking, so it's a bit more sheer, but it stills offer a good amount of color on the lips.

Texture, Application and Wear : These apply very smoothly to the lips. They're not too sticky, just enough so that they stay on a little while. I wouldn't say these wear exceptionally long since they are, after all, lip glosses. My guess is they would wear about 2 hours without touching up if you don't eat or drink.

Finish : They look very glossy on the lips, especially the plush red shade. Both are a cream finish, meaning that they do not contain glitter or shimmer. That's usually how I prefer my glosses. I believe other shades from this range contain shimmer, but the two I have don't.

Packaging : The packaging is simple and practical. They have a little bow at the top of the cap which is think is a very cute touch. I quite like the packaging.

Scent : The scent of these lip glosses is what I was kind of concerned about before I received them. The reason being that many people on Youtube say that they hate the smell. The smell of the NYX Mega Shine Lip Glosses is quite strong and I understand why some people might not enjoy it. It's a very sweet cherry smell. Personally, it doesn't bother me, and I don't smell it once it's on my lips. If you're very sensitive to smells, you might not like this product though.

Price : 5$ each

Overall : I'm very happy with the NYX Mega Shine Lip Gloss shades that I got and with the quality of these glosses in general. I'm thinking of getting more in the near future. I'm not much of a gloss wearer, but since the glosses aren't too sticky, I find them quite comfortable to wear. 8.5/10

Lip Swatches
Natural 

Plush Red

---

That's all for today's review, I hope this helps! Let me know if you've ever tried NYX Glosses!

Don't forget to follow me and like my Facebook page for more posts like this ♥

Sunday, 3 November 2013

Wearable brown and green Makeup Using the Comfort Zone Palette

Hey everyone! Today I'm sharing a look I made using the Wet n Wild Comfort Zone Palette! I absolutely love this palette because it's quite versatile and can give you a variety of wearable looks. This time I went for a pale green on the lid and the brown with a green shift in the outer corner and crease. 


I love the way it turned out (except the liner, which is a little bit wonky, sorry about that!). What do you think of this look? Would you wear something like this? Let me know in the comments!


Don't forget to follow me and like my Facebook page for more posts like this ♥

Sunday, 20 October 2013

My Everyday Foundation Routine

Hey all! Today I decided to share with you all the products that I use on a regular basis to make my skin look nice and to hide any imperfections! I've mentioned this before, but I don't wear makeup every single day. So this foundation routine is essentially what I'll do if I decide to wear makeup (and the foundation routine I use to prep my skin for any blog posts on here!). So in case you were wondering what's on my skin, well here it is!

My skin

First, I'll talk a little about my skin, so that you can determine if the products I'm using would suit your skin in case you want to try any of these products. My skin is usually normal to dry and I don't get oily very often. (although this spring and summer my skin has been uncharacteristically oily) The main issues I have with my skin is redness in the cheeks (I have rosacea) which I need to cover and some acne here and there. My under eye area also tend to be dry and I get flaky skin on my nose and forehead on occasion. With that said here is how I proceed to concealer and brighten my complexion :

Base

First, I apply moisturizer. Lately I've been liking the Moisture hydrating lotion by Neutrogena because it has SPF 30. I like using the Real Techniques buffing brush or Expert Face Brush to apply this. In the winter, I use a heavier moisturizer because my skin gets drier. After moisturizing, I spray my face with the Urban Decay All Nighter Spray. This is a new step to my routine and I haven't determined how useful it is yet, but for now, I'm testing it out.

Foundation


Next, I apply my foundation using the same brush.  (I also often use my hands for this) Lately, my favorite is the Rimmel Wake me Up Foundation. I love how silky it is on the skin and it think the coverage is great. It leaves a nice dewy finish, which I prefer since I tend to have dry skin. I'm not big on matte finishes on myself since it tends to bring forward the dry patches on my skin which isn't very flattering. Personally, I like doing my foundation first for a couple reasons. First, many of my problem areas are usually well concealed with just foundation which eliminates the need to cake on more product by adding concealer. Second, I hate fixing fallout from my eye shadow once I have foundation on. I prefer wiping everything clean and then applying my face products. Lastly, I haven't found a concealer that I like a lot for my under eye yet so I like to apply a slippery foundation on first so that the concealer has a base so set on and it doesn't get into the fine lines around my eyes as much. Phew, that was a lot of information wasn't it? I guess I have loads to say about foundation :P

Concealing

Next, I conceal anything that is still showing through with either Maybelline Mineral Power concealer and/or Maybelline Dream Lumi Highlighting concealer. I like to apply the lumi in a triangle shape underneath my eyes from time to time if I'm going for a bright highlighted look. I like  to pat on my concealer to blend it out. I also sometimes use the deluxe crease brush from Real Techniques to blend, especially if I went heavy underneath the eyes and I don't want to ruin my blending job by patting with my fingers over it.

Powders

 Last, I powder the middle of the skin using the Stay Matte Powder by Rimmel and with a blush brush by Eco Tools. I only do it in the center of my face to conserve the dewyness of the foundation. After that, I also apply blush with the same brush. I don't really have an everyday blush, but I do really like this one by Rimmel called Pink Sugar. Next I highlight the top of my cheekbones with the Stila Highlighting duo in Kitten using the contour brush by Real Techniques. After all is applied, I spray my face again with the Urban Decay Spray to help it stay on longer and to attenuate the look of powder on my skin, which I am not a fan of.

The results

Clearly, I also have eye makeup on here, but let's focus on the skin :P I also want to mention that my lights are very hot, which make my skin look a little more shiny than it really is in real life.

That's all I do! I hope you enjoyed this post! Let me know in the comments what your favorite face products are! I'm love trying out new ones! I really want to try a few new foundations and concealers. Let me know if you have any recommendations.

Don't forget to follow me and like my Facebook page for more posts like this ♥


LinkWithin

Related Posts Plugin for WordPress, Blogger...