Showing posts with label Easy. Show all posts

Friday, 13 June 2014

Pokemon Series : Meowth Inspired Makeup

Hey all! It's been a while since I posted a Pokemon makeup look and I was inspired to make a Meowth inspired one lately, so here it is :)


Products used :

Base
  • UDPP
  • Urban Decay 24/7 Glide on Pencil in Perversion
  • NYX Jumbo Eye Pencil in Milk

Eyeshadow & Brows
  • CS 88 Warm Palette 
  • NYX Eyebrow Cake Powder in Ash

Liner & Lashes
  • Red Cherry #28 Lashes
  • Cover Girl Clump Crusher Mascara
  • L'Oréal Lineur Intense Liquid Liner in Blackest Black
  • Rimmel ScandalEyes Khol in Nude
---

Check out my other posts from the Pokemon Series : Bulbasaur, Charmander, Squirtle, Kakuna, Arbok, Pikachu, Vulpix, Jigglypuff, Zubat, Oddish, Meowth, Gyarados


Don't forget to follow me and like my Facebook page for more posts like this ♥

Wednesday, 11 June 2014

Eye of the Day (EOTD) : Neutral Lids with pop of Blue

Hey everyone! I'm super busy again, so I tought I would simply quickly share a neutral eye look I did today! It's a simple and wearable eye look with neutrals on the lid and a pop of blue on the lower lashline! I'm really into all kinds of variations of this makeup look lately. I guess you probably noticed from my Seaside makeup look I posted a few days ago. It's quite similar! If you like this look, you should check it out, I listed all the products I used to create it in the post! Hope you enjoy this quick makeup inspiration! Have a nice day everyone ♥


Don't forget to follow me and like my Facebook page for more posts like this ♥

Monday, 9 June 2014

Fun Wearable Summer Night Makeup using Darling Girl Cosmetics

Hey everyone! It's been a while since I've busted out my DGC shadows last, so I felt like having a little fun with them the other night. Since the weather has been nicer recently, I've been inspired to do more summer appropriate looks. Now this look is quite deep and dark, but with the shimmer and the hint of purple, I feel like it would be great for a summer night out. Let me know what you think!


I'm not entirely sure I remember the shadows I used to do this. I think I did L'Oréal Infallible Shadow in Tender Caramel as a base all over the lid and then I built over that. I think I did Dark Heart and Dark Crystal in the crease and outer corners and Beluga Bebe on the inner lid, but I could be wrong! Sorry about that :S I totally forgot to make notes of the colors I used. :( Hope you still enjoyed this! 


Don't forget to follow me and like my Facebook page for more posts like this ♥

Saturday, 22 March 2014

Neutral and Matte Graduation Picture Makeup

Hey all! Today I'm sharing the makeup I wore for my graduation photo. The photo agency recommend a matte, neutral but polished look, so that's what I went for of course. I did a barely there eye look, pinky cheeks and a natural lip color. I simply deepened up the crease a little bit, defined my eyebrows, added some half lashes and went for flawless skin. I think it turned out very natural, but put-together. It looks nice with or without flash and could be worn to a number of occasions. Also, it was my first time wearing falsies out of the house and they didn't get unglued or anything so I'm really happy!

With Flash

No flash
Sorry for the weird face I'm making, just couldn't get a good picture that day! ahah :P

Products used :

Face
  • Cover Girl Stay Fabulous 3 in 1 Foundation
  • Mac Pro Longwear Concealer (NC 15)
  • Rimmel Stay Matte Powder
  • Canmake Cream Cheek in 09

Lips
  • Revlon Just Bitten Kissable Lipbalm in Honey

Eyes
  • UDPP
  • Maybelline Define-a-Brow in Dark Blonde
  • The Balm Nude Tude Palette - Sultry (to deepen and warm up the crease)
  • Urban Decay Naked 2 Palette - Tease (Crease), Foxy (Lid and brow bone)
  • L'Oréal Infallible Lacquer Cream Liner in Very Black
  • Ardell 315 Half Lashes
  • Cover Girl Clump Crusher Mascara

---

That's all hope you enjoyed this! Have good day everyone! 

Don't forget to follow me and like my Facebook page for more posts like this ♥

Monday, 17 March 2014

St-Patty's Day Makeup Look

Hey super quick post tonight. I don't usually do this, but it's St-Patty's day and I wore a pop of green to celebrate today. I really liked the look of it so I thought I would share it really quickly! Hope you enjoy, good night everyone ♥


Don't forget to follow me and like my Facebook page for more posts like this ♥

Friday, 14 February 2014

Fiery Orange and Red Eye Makeup

Happy Valentine's Day everyone! Hope you all have a nice day with all of your loved ones or significant others! 

Today I'm sharing another eye makeup look that I created. There is no real inspiration for this look as opposed to most of my recent looks. I only wanted to have some fun with my makeup on this one and I love how it turned out so I thought I would share! It's fiery, red, orange and sparkly. I guess it kind of works with the Valentine's Day theme when I think about it, with it being the holiday of love and seduction and all. Or maybe that's stretching it a little bit ;) Anyway, hope you all enjoy ♥


Products used :

Base
  • UDPP
  • NYX Jumbo Eye Pencil in Milk

Eyeshadow & Brows
  • Darling Girl Cosmetics Loose Shadow in Sirena
  • Stila in the Lights Palette - Bare
  • Coastal Scents 88 Warm Palette (dark burgundy color)
  • Maybelline Define a Brow Eyebrow Pencil in Dark Blonde
  • L'Oréal Infallible Shadow in Amber Rush
  • Maybelline Color Tattoo Pigment in Barely Brazen

Liner & Lashes
  • Cover Girl Clump Crusher Mascara
  • NYX Jumbo Pencil in Yogourt
  • L'Oréal Eye Studio Gel Liner in Black

---

Don't forget to follow me and like my Facebook page for more posts like this ♥

Saturday, 8 February 2014

Valentine's Day Date Makeup Using Urban Decay Naked 1 Palette

 Hey all! This is the last one of my Valentine's day looks using the Naked palettes! This one is a golden look with flawless skin, nude lips and a peachy blush. I hope that you enjoyed this series! Let me know what you think in the comments ♥


Different lighting
You can't see much in this lighting, but I like the picture :P


Products used :

EYES

  • UDPP
  • Maybelline Define a brow in Dark Blonde
  • Red Cherry #119 lashes
  • Cover Girl Clump Crusher Mascara
  • Elf Liquid Liner in Black
  • Urban Decay Naked 1 Palette :

All over the lid and inner corner : Half Baked
Second part of the lid : Smog
Outer corner, lower lashline and crease : Dark Horse and Creep
Crease : Buck
Brow bone : Virgin
Crease : Liar

FACE
  • Cover Girl 3 in 1 Stay Fabulous Foundation
  • Wet n Wild Reserve your Cabana Powder
  • Benefit Hoola Bronzer
  • Barbie Loves Stila Peach Blush
  • Hard Candy Tiki Bronzer
LIPS
  • NYX Round Lipstick in Pumpkin Pie

---

Don't forget to follow me and like my Facebook page for more posts like this ♥

Tuesday, 4 February 2014

Valentine's Day Date Makeup Using Urban Decay Naked 2 Palette

Today I have another Valentine's Day date makeup look to share. For this one I used the Urban Decay Naked 2 Palette. I feel like the Naked Palettes are really perfect for romantic, natural but seductive eye looks. I'm really enjoying this series! Apparently I'm doing them in reverse order, the last being the Naked 1 which will be coming up soon!

For this look I went for a very defined crease with a very shimmery eye. I kept the edge of the shadow super neat by applying a tape during makeup application. I chose full long lashes and a noticeable, but not too thick winged liner. I kept the face very flawless and accentuated my cheeks and lips with a soft pink color. Overall, I think this look is perfect for a romantic date! I hope you all enjoy it ♥

Full Face

Full Face with different lighting


Close Up

Products used :

EYES

  • UDPP
  • Maybelline Define a brow in Dark Blonde
  • Red Cherry #119 lashes
  • Cover Girl Clump Crusher Mascara
  • Elf Liquid Liner in Black
  • Urban Decay Naked 2 Palette :

All over the lid and inner corner : Verve
Outer corner, lower lashline and crease : Busted
Crease : Tease
Brow bone : Foxy
Crease : Liar

FACE
  • Revlon Photo Ready Foundation
  • Wet n Wild Reserve your Cabana Powder
  • NYC Synny Bronzer
  • Canmake Cream Cheek Blush in Marshmallow Pink
  • Maybelline Magic Lumi Highlighting Concealer
LIPS
  • Revlon Kissable Balm Stain in Honey
  • NYX Butter Gloss in Éclair

---

Don't forget to follow me and like my Facebook page for more posts like this ♥


Friday, 31 January 2014

Valentine's Day Date Makeup using Urban Decay Naked 3 Palette

Hey all! Since Valentine's Day is right around the corner I thought I'd start a mini series using the 3 Naked Palettes to create romantic date night makeup looks! I was most excited about doing a look using the Naked 3 Palette because of the rosey shades so I'm starting with this one.

I did a rosey sort of smokey look with heavy winged liner paired with a rose colored glossy lip. I really enjoy how this turned out! It's soft, and pretty, but kind of gives a smoldering look, perfect for a date night! Keep reading if you want to know how I created this look. ♥


Products used :

EYES

  • UDPP
  • NYX Jumbo Eye Pencil in Milk
  • Maybelline Define a brow in Dark Blonde
  • Ardell Wispies Lashes
  • Cover Girl Clump Crusher Mascara
  • Elf Liquid Liner in Black
  • Urban Decay Naked 3 Palette :

Inner corner and brow bone : Strange
All over the lid : Liar
First third of the lid : Trick
Middle of the lid : Dust
Outer corner : Factory
Crease : Liar
Outer crease : Darkside and Blackheart
Lower lashline : Trick (inner), Blackheart (outer)


FACE
  • Nars Tinted Moisturiser
  • Wet n Wild Reserve your Cabana Powder
  • Benefit Hoola Bronzer
  • NYC Sunny Bronzer
  • Stila Loves Barbie 3 Pan Palette Coral Blush 
  • Maybelline Magic Lumi Highlighting Concealer
LIPS
  • NYX Round Lipstick in B52
  • Estée Lauder High Gloss in Blush

---

Don't forget to follow me and like my Facebook page for more posts like this ♥

Friday, 15 November 2013

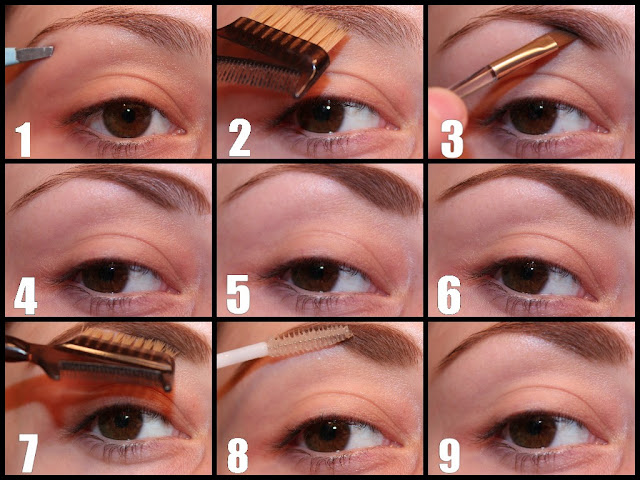
Beginner Series : How To Fill In Eyebrows - Step By Step Tutorial

Hello everyone! Today I'm back with my beginner series! Today I thought I would share my tips and tricks as well as a step by step tutorial on how I fill in my eyebrows! My method is quite easy and quick and really makes a difference. Keep reading if you're interested to see the tutorial :)


- Brow powder that matches your brows. I believe if you have light hair you need to go a few shades darker and if you have dark hair it's the opposite, but don't quote me on that! For my color, I went with trial and error. I use this Milani Brow Fix Kit and I mix both brown colors to achieve a color that I like.
- An angled brow brush. I like to use the one that comes with the kit, but you can use any one that you have.
- Tweezers
- Clear brow gel, I like to use clear mascara for this purpose. As you can see mine is starting to look brown and gross, but it's still works the same.
- A brow comb
- A shimmery highlight shade

How to Fill In Your Eyebrows

1) Tweeze any stray hairs.
2) Comb the lashes so that no hair is sticking out.
3) Using the angled brush and the brow powder in your chosen color, start filling the brow at the base on the brow. I like to fill in the front on my brows first and the tail last because that's where I apply the most product. Use short strokes to get the effect of hairs.
4) Using the same technique, now define the upper portion of the brow.
5) Fill it in.
6) Finish by filling in the tail of the brow.
7) Brush the eyebrows into place again. This will help reduce the appearance of drawn on brows and make it look more natural by getting rid of any excess product.
8) Using the brow gel, apply a small amount to the brows to help seal the product as well as keep them in place during the day.
9) This last step is optional, but if you want to further define the brow, you can use an angled brush and apply a light shimmery shade close to the brow on the brow bone.


---

That's all! You're brows are now groomed and ready for the day. Pretty easy right? Let me know if this tutorial was helpful to you!

Don't forget to follow me and like my Facebook page for more posts like this ♥

Sunday, 3 November 2013

Wearable brown and green Makeup Using the Comfort Zone Palette

Hey everyone! Today I'm sharing a look I made using the Wet n Wild Comfort Zone Palette! I absolutely love this palette because it's quite versatile and can give you a variety of wearable looks. This time I went for a pale green on the lid and the brown with a green shift in the outer corner and crease. 


I love the way it turned out (except the liner, which is a little bit wonky, sorry about that!). What do you think of this look? Would you wear something like this? Let me know in the comments!


Don't forget to follow me and like my Facebook page for more posts like this ♥

Saturday, 12 October 2013

Wearable Color : Neutral Eye with Vibrant Green Liner

Recently, I went to Ardène Dépôt (they sell some of the stuff from previous collections at 70% off) to pick up some earrings and camis. While I was at the checkout, I noticed that they sold colored liquid liner. I'm usually wary of their makeup for some reason, but since I'd been on the hunt for colored liners and I'd had trouble finding what I was looking for, and since these were 1.50$ each, I decided, why not give them a try! I got two glitter liners and two colored liners, including this vibrant green shade!

I love the way it looks on! It's very easy to apply and the brush of the liner is very thin which gives you a lot of control. I'm really happy with this purchase, except for the fact that this green liner stains! :s  (The other colors don't as far as I know).


That's all for this quick eye makeup look! Don't forget to follow me and like my Facebook page for more posts like this ♥

Tuesday, 8 October 2013

Fall Series : My Everyday Makeup Look For Fall

Hey all! Today I'm sharing my everyday makeup look for the fall months. Now, I don't wear makeup every single day (so maybe it would be more aptly called my go-to makeup), especially not eye shadow, but whenever I decide to put makeup on, this is pretty much what I end up with!

The makeup look I go for most often during the fall is dewy skin, with a pretty highlight, neutral lips and a shimmery champagne color on the lids. I know many people tend to gravitate more towards a matte finish foundation during the colder months, but personally, as the weather grows colder, my skin becomes drier, which means I need the dewy finish more than ever. That's why I prefer this type of finish year round. I haven't included the skin products I used in this post, but look forward to a Foundation Routine coming from me soon!


Close up
 With the light, it almost looks like I have nothing on, but I definitely do! I have Bootycall all over the lid and Snakebite on the outer corner. I have Tease in the crease and Foxy to highlight the brow bone.


 What I Used

UDPP, Black L'Oréal Gel Liner, Clump Crusher Mascara, Nude Eye Khol by Rimmel, Honey Kissable Balm Stain by Revlon, Naked 2 Palette by Urban Decay, Brow Fix in Light by Milani and Clear Great Lash Mascara by Maybelline

That's it for today! Would you wear something like this? What's your go-to makeup in the fall? Let me know in the comment!

Don't forget to follow me and like my Facebook page for more posts like this ♥

LinkWithin

Related Posts Plugin for WordPress, Blogger...